So let me tell you something funny. First time I tried woodworking epoxy resin, I mixed the two parts without reading anything. I just thought ok it’s like fevicol, pour it and done. Brother, within 10 minutes it was getting warm in my mixing cup and I panicked. I thought I broke something expensive. Wasted half my kit that day.
That was my starting. And if you are also a total beginner in woodworking epoxy resin, I don’t want you to waste money like I did. So I am writing this from my own experience. No big fancy words. Simple talking only.
What Is Woodworking Epoxy Resin Exactly
Okay so woodworking epoxy resin is basically a liquid material which you mix with a hardener and it becomes solid after some time. It sticks to wood really well and makes it super strong and shiny also.
It comes in two bottles always. One is the resin, and other one is the hardener. You mix both together in the right amount and then some chemical reaction happens inside and it slowly becomes hard like a rock. You cannot stop this process once you start mixing, so keep that in mind.
The main reason people use woodworking epoxy resin is because it can fill cracks in wood, make a table top glossy, make river tables, do small decoration projects and much more things. It’s really very useful material once you understand how it works.
I personally started using it for fixing a small crack in my old wooden desk at home. The result was actually nice and that is when I got addicted to woodworking epoxy resin projects.
Why Beginners Should Try Woodworking Epoxy Resin
Okay so many people think this is complicated material only for professional woodworkers. That is totally wrong thinking. I am a simple DIY wood hobbyist from India and I use woodworking epoxy resin at home without any big fancy workshop setup.
The best part about woodworking epoxy resin is you don’t need expensive machines. You only need some basic items and little patience. Even if you are doing it for the first time, small projects are not that difficult. Things like coasters, bookmarks or filling small cracks are perfect starting woodworking epoxy resin projects for a beginner.
Also the material is available everywhere now in USA. You can find woodworking epoxy resin near me by simply searching on Amazon, Home Depot, Walmart, Michaels craft store. So getting the material is not a big problem.
And budget wise, you dont have to spend a lot. A basic woodworking epoxy resin kit starts from around 15 to 20 dollars only. That is quite affordable honestly. You dont need to buy a woodworking epoxy resin for sale kit that costs 80 or 100 dollars when you are just learning.
Types of Woodworking Epoxy Resin You Should Know
This is something most beginner articles dont explain properly. So let me tell you clearly.
There are mainly two types you will deal with as a beginner.
Table Top Epoxy Resin is for coating surfaces. Like if you want a shiny layer on top of your wooden table or wooden tray, this one is used. You pour a thin layer, it self levels on its own and gives you that beautiful glassy look. If you are making an epoxy resin for wood table this is probably what you want.
Deep Pour Epoxy Resin is used when you need to fill a big gap or make something like a river table where the layer is thick. For beginners I would honestly say start with table top first because deep pour needs more care and temperature control.
For fixing cracks specifically, best epoxy resin for wood cracks is usually a low viscosity type means it is thin enough to go inside the crack properly. Thick resin wont go inside small cracks easily so keep this in mind when buying.
If you are planning outdoor use then you need waterproof epoxy resin for wood specially. Not every resin is good for outside. Check the label if it says UV resistant also because sunlight can make cheap resin turn yellow color over time.
What Do You Need Before Starting
So before you buy anything let me tell you what tools you will need along with your woodworking epoxy resin kit.
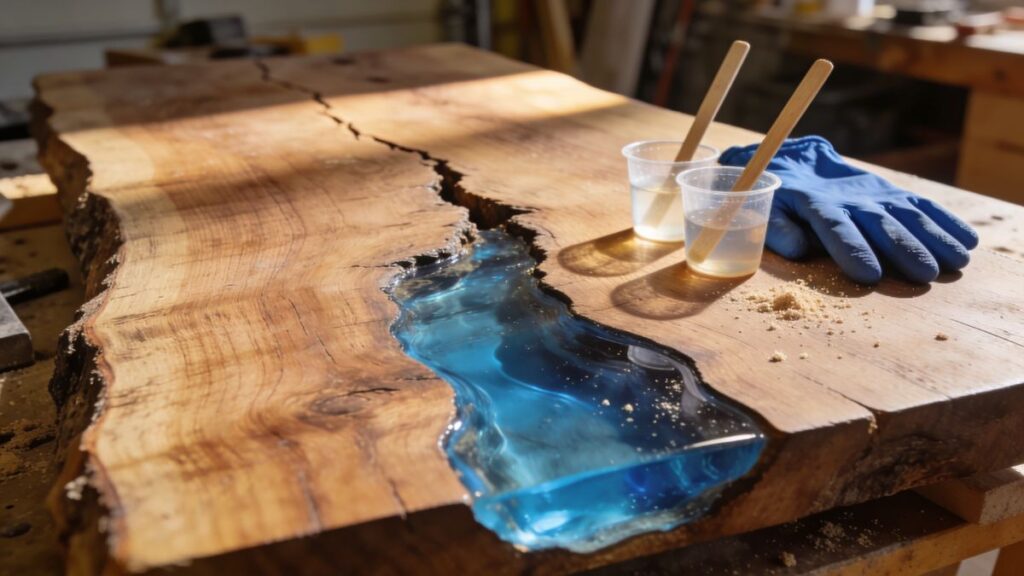
First thing is disposable gloves. Please don’t skip this. Resin can irritate your skin and it sticks badly. Nitrile gloves are good.
Second is a respirator mask or at least a good dust mask. Some resins have fumes, especially in closed rooms. Work near a window or outside if possible.
Third is measuring cups. This is very important. You have to mix resin and hardener in exact ratio. Most beginner woodworking epoxy resin kits come in 1:1 ratio means equal parts of both. But some are 2:1 so read the label properly before mixing.
Fourth is stir sticks or wooden popsicle sticks. Mix slowly and thoroughly for at least 3 to 4 minutes. Don’t rush this step, mixing properly is really important otherwise your woodworking epoxy resin will stay sticky and never harden properly.
Fifth is a heat gun or small torch. This is for removing air bubbles after pouring. Just pass the heat gently over the surface and bubbles will pop. Very satisfying actually.
If you are just starting woodworking and also want to understand the basics better, do check out this article on how to get into woodworking which I wrote earlier. It will help you understand the foundation before jumping into epoxy work.
How to Use Woodworking Epoxy Resin Step by Step
Okay so let me walk you through the basic process. This is what I follow myself.
Step 1 is Wood Preparation. Your wood must be completely dry. This is very very important. If the wood has moisture inside, the woodworking epoxy resin will not stick properly and may even separate after some time. Sand the wood surface starting from rough sandpaper like 120 grit and then go to finer like 220 grit. Clean all the dust properly with a dry cloth.
Step 2 is Sealing the Wood First. This step most beginners skip and then wonder why there are so many bubbles in their pour. You see, wood is porous so it has tiny air holes. If you pour resin directly these holes release air and you get bubbles everywhere. So apply a thin seal coat of resin first, let it get little bit sticky but not fully hard, then pour your main coat on top. This is the correct way.
Step 3 is Mixing Your Woodworking Epoxy Resin. Now take your measuring cups and measure exactly as per the ratio on your specific woodworking epoxy resin kit. Pour slowly. Stir slowly for minimum 3 to 4 minutes. Scrape the sides of the cup while mixing but dont scrape the very bottom last bits because those unmixed parts can make sticky patches in your final piece.
Step 4 is Pouring. Pour the mixed woodworking epoxy resin slowly over your wood. If it is a table top pour, it will spread by itself because of self leveling property. For cracks, pour slowly and let it settle down inside the crack. You can use a dropper or small cup to pour in narrow cracks carefully.
Step 5 is Bubble Removal. Within a few minutes of pouring take your heat gun or torch and pass it gently over the surface. Don’t hold too close or too long. Just a quick pass is enough. The bubbles will come up and pop. Do this 2 to 3 times in first 30 minutes.
Step 6 is Curing. Cover your piece with a clean box or tub so no dust falls on it. Keep the room temperature between 70 to 75 degrees Fahrenheit roughly. Too cold means it cures very slow, too hot means it cures too fast and might crack or warp. Most woodworking epoxy resin takes around 24 hours to cure to touch and full hardness in 72 hours or 3 days.
Step 7 is Sanding and Finishing. After full cure you can sand the surface if needed. Start with 400 grit and work up to 1500 grit for a very smooth finish. If you want that super glossy look back after sanding, you will need to polish it or apply another thin coat of woodworking epoxy resin on top.
Best Budget Woodworking Epoxy Resin Projects for Beginners
So now you know the basics, let me share some easy woodworking epoxy resin projects you can start with without spending too much.
Coasters are the absolute best starting project. Take a small piece of wood, sand it smooth, pour a thin colored layer of woodworking epoxy resin on top. Done. Even if you mess up the cost is very low.
Wood Crack Filling is also very easy. Have an old wooden furniture piece with a crack? Buy a small woodworking epoxy resin kit, fill the crack, sand it flush after curing. Looks clean and the furniture is saved too.
Wooden Tray with Resin Top is another fun one. Make or buy a simple wooden tray, pour clear or colored woodworking epoxy resin as the surface coating, let it cure. Very useful and it looks really good.
Small River Effect Piece is something a little more interesting once you are comfortable. Take two pieces of wood, place them with a gap between, pour colored woodworking epoxy resin in the gap. Looks like a mini river frozen in wood. Very satisfying.
If you are thinking about bigger projects like a full desk or round table you can get some inspiration from this woodworking desk plans guide which has some nice ideas for beginners too.
Where to Buy Woodworking Epoxy Resin on a Budget
So many beginners ask me about woodworking epoxy resin near me options and also woodworking epoxy resin for sale deals. Let me give you some honest advice here.
For your first purchase, don’t go for the most expensive option. A basic 32 oz woodworking epoxy resin kit is enough to start. Look for one that has 1:1 mix ratio because it is easiest for beginners. Also look for self leveling property if you want to coat surfaces.
Amazon has many options and honestly the budget ones from brands like Dr Crafty, Stone Coat or similar work totally fine for small beginner woodworking epoxy resin projects. You dont need to pay for a professional gallon kit as your first purchase.
Home Depot and Walmart also carry woodworking epoxy resin near me in their craft or hardware sections. Sometimes you can find small beginner woodworking epoxy resin kits for under 20 dollars which is great value to practice with.
For the best woodworking epoxy resin on a budget, always check reviews about yellowing. Some cheap resins turn yellow very fast especially in sunlight. Look for UV resistant ones even in the budget range.
One very useful resource I want to share is the TotalBoat TableTop Epoxy page where they have simple beginner tips for woodworking epoxy resin mixing and projects. Another good one is ArtResin epoxy resin guide which explains bubbles and wood pouring in easy words for newbies like us.
Also you can check this detailed woodworking epoxy 7 step guide I made earlier which goes even deeper into the actual woodworking with epoxy process.
Common Mistakes Beginners Make With Woodworking Epoxy Resin
Okay so let me be honest about mistakes because this will save you money and frustration.
Mistake number one is not measuring properly. If your ratio is wrong, the woodworking epoxy resin will stay soft or have tacky sticky spots. Always measure properly, this cannot be skipped.
Mistake number two is using wet or damp wood. I said this before but I will say again. Wet wood and woodworking epoxy resin dont work together. The resin will lift or bubble from the wood surface.
Mistake number three is working in cold temperature. If your room is below 65 degrees Fahrenheit, the woodworking epoxy resin will cure very slowly or might not cure well at all. Warm up your space a bit before working.
Mistake number four is scraping the mixing cup walls at the very end. Those unmixed bits near the sides and bottom will make sticky patches in your finished piece. Leave them in the cup, dont include them in your pour.
Mistake number five is not covering the piece while curing. Dust falls on wet resin and gets stuck permanently. Even one hair or a dust particle can ruin a clear pour. Cover it always.
Mistake number six is working indoors without ventilation. Even low odor woodworking epoxy resin needs some air movement. Open a window at minimum. Your lungs will thank you.
FAQ About Woodworking Epoxy Resin
What is the best woodworking epoxy resin for a total beginner on a budget?
A 1:1 mix ratio clear table top resin kit under 20 dollars from brands like Dr Crafty or similar is perfect to start. It is easy to mix and gives good results on small projects.
Can I use woodworking epoxy resin to fix cracks in old furniture?
Yes absolutely, a low viscosity woodworking epoxy resin works great for filling wood cracks and the bond is very strong and permanent once cured fully.
How long does woodworking epoxy resin take to dry completely?
Most table top resins are touch dry in about 24 hours but full hardness comes in 72 hours so avoid handling or stressing the piece before 3 days.
Is waterproof epoxy resin for wood safe for outdoor projects?
Yes but only if it says UV resistant on the label. Normal woodworking epoxy resin without UV protection will turn yellow or cloudy outdoors within weeks or months.
My Final Thoughts on Woodworking Epoxy Resin
So honestly, woodworking epoxy resin is one of those things that looks scary from outside but is actually quite fun once you try it. I remember being nervous my first time but now it is one of my favorite things to do in my small home workshop.
The key thing I want you to take away is this. Start small. Dont buy a huge expensive woodworking epoxy resin kit for sale when you are just learning. Get a small budget kit, do a coaster or crack fill first, understand how the material behaves, and then slowly move to bigger woodworking epoxy resin projects.
Also dont forget to wear your gloves and work in a ventilated space. Safety is boring to say but important to follow.
Woodworking epoxy resin has so much potential for creative projects and also for practical repairs around the home. Whether you want to make a gorgeous epoxy resin for wood table or simply save an old cracked piece of furniture, this material can do it all.
If you have any questions about your first woodworking epoxy resin project just drop a comment below. I am always happy to help fellow beginners. And if you messed up your first pour, don’t worry, I messed up mine too. Just keep going.
Happy building friends!