Okay so I still remember the first time I made a small wooden shelf. It looked… decent. But those screw holes? Man, they were just sitting there, staring at me. Ugly. Like little craters on the surface of wood. Thats when someone told me about woodworking plugs and honestly it changed everything for me.
If you are just starting with wood projects and you dont know what woodworking plugs are, dont worry. I had no idea either. This guide is for total beginners and I will explain everything step by step the way I wish someone had told me.
What Are Woodworking Plugs Anyway?
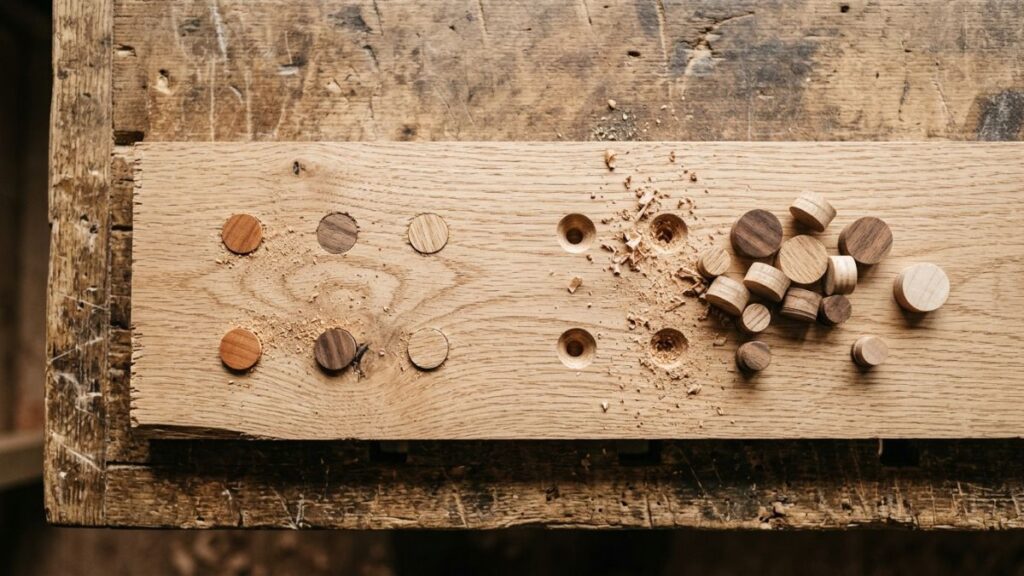
So basically, woodworking plugs are small round pieces of wood. You use them to cover screw holes or nail holes in your wood project. When the screw goes in, it leaves a hole on top, right? Woodworking plugs just go inside that hole and cover it up completely.
The final look is so much cleaner. Nobody can see the screw anymore. It just looks like solid wood. No metal peeking out. No ugly putty that never matches the color. Just pure wood finish.
I use woodworking plugs now in almost every project I do. Shelves, boxes, small tables, you name it. Once you start using them, you cant stop honestly.
Why Use Woodworking Plugs Instead of Wood Putty?
Okay this is a question I get asked a lot. Why not just use wood putty to fill screw holes?
Look I tried putty. Many times. The problem is, wood putty never ever matches the wood color properly. When you stain or paint the wood, the putty spot looks different. It stands out. People notice it immediately.
Woodworking plugs on the other hand are made from real wood. If you use the same type of wood as your project, the grain matches. After staining, it looks like one continuous piece of wood. Nobody can tell where the screw is hiding.
Also putty can crack over time especially in furniture. Wooden plugs are much more durable and they stay in place for years.
So yes, woodworking plugs are just better. Period.
Woodworking Plugs Sizes You Need to Know
This is where beginners get confused a lot. What size plug should I buy or make?
The most common woodworking plugs sizes are:
1/4 inch plugs, these are the smallest ones. Good for thin pieces of wood or when you use small screws.
3/8 inch plugs, this is honestly the most popular size. Most people use this for regular furniture and shelving projects. 3/8 inch is like the all rounder size.
1/2 inch plugs, these are bigger and used when you have larger screw heads or thicker wood.
There are also bigger sizes like 5/8 inch and 3/4 inch but as a beginner you probably wont need them right away. Start with 3/8 inch, that size fits most screw holes in normal woodworking projects.
The wood plug sizes you pick must match the counterbore hole you drill. So before buying plugs, check the size of the hole your drill bit makes. They need to match exactly or the plug wont fit tight.
Types of Woodworking Plugs
Okay now lets talk about the different types. Because not all woodworking plugs look the same. Some are flat, some are fancy, some have a rounded top. Let me break it down simply.
Flat Top / Face Grain Plugs
These are the most common type. The top is flat and the plug tapers slightly so it fits tight into the hole. Face grain means you see the natural wood grain on top. When you stain the wood, these blend in very nicely because the grain direction is visible.
End Grain Plugs
These show the end of the wood grain on top. They look slightly different after staining because end grain absorbs more stain and becomes darker. Some people like this look, some dont. It is a style choice really.
Button Top Wood Plugs / Decorative Wood Plugs
Now this is the fun one! Button top wood plugs have a slightly raised round dome on top. Instead of hiding the plug, these actually show it off as a design feature. Very commonly seen on handmade wooden furniture, rustic chairs, outdoor benches and stuff like that.
Decorative wood plugs like these add a nice handcrafted look to your project. If you are making something like a wooden stool or a side table, button top plugs can make it look really charming and intentional. Not like you were trying to hide something!
Floor Plugs
These are straight sided and designed specifically for hardwood floors. The straight sides make sure they dont wobble when walked on. These are not something beginners usually need but good to know they exist.
What Wood Are These Plugs Made From?
You can get woodworking plugs in many different wood types. Oak, maple, walnut, cherry, mahogany, birch, poplar… many options.
My advice? Try to match the wood of your project. If you are building something in pine, use pine plugs or close match. If you are doing an oak shelf, get oak plugs.
For furniture projects especially, matching the wood type makes a big difference in how the final finish looks. The grain pattern will blend in and it will look so professional.
Maple and oak plugs are the most commonly available and also budget friendly. Walnut is more expensive but looks gorgeous on contrast pieces.
Wood Plugs for Furniture Projects Specifically
If you are making wood plugs for furniture, there are few extra things to keep in mind.
First, always drill the counterbore hole before you drive the screw in. Dont screw first and then try to drill around it. The sequence matters.
Second, think about grain direction. When you put the plug in, try to align the grain of the plug with the grain of the surrounding wood. This way after sanding it almost disappears.
Third, use a little wood glue when inserting the plug. Dont overdo the glue, just a thin coat. Too much glue will squeeze out and stain the wood around the hole. That looks bad.
If you are working on something like a woodworking desk plans project or a dining table, getting the plugs right is really important because people will look closely at furniture. You want it to look clean.
How to Use Woodworking Plugs Step by Step
Alright lets get practical. Here is how I do it, simple as possible.
Step 1. Drill the counterbore hole first.
Use a Forstner bit or a counterbore bit. The hole needs to be the right diameter to match your plug size. So if you buying 3/8 inch plugs, drill a 3/8 inch hole.
Step 2. Drive the screw in.
Now screw it in. The screw head sits inside the counterbore hole, below the surface.
Step 3. Apply a small amount of wood glue inside the hole.
Just a thin coat on the walls of the hole. Not too much.
Step 4. Insert the woodworking plug.
Put the plug in with the grain aligned. Tap it gently with a mallet or a hammer and a scrap piece of wood. Dont smash it, just tap it flush.
Step 5. Let the glue dry.
Give it at least 4 to 6 hours. Overnight is better honestly.
Step 6. Trim the plug flush.
Use a flush cut saw to trim off the small bit sticking out above the surface. Go slow and careful here.
Step 7. Sand it smooth.
Sand first with 80 or 100 grit, then go finer like 150 or 220 grit. The plug should blend into the surface.
Done! You now have a professional looking finish with no visible screws. Feels good when you see it the first time, trust me.
Making Your Own Woodworking Plugs vs Buying Them
Okay so you can either buy ready made plugs or make your own. Both options have their uses.
Buying woodworking plugs is the easiest option for beginners. You just match the size to your counterbore hole and done. If you are wondering about woodworking plugs for sale, you can find them easily at Home Depot, Amazon, Rockler, or specialty wood stores.
The wood plugs for screw holes Home Depot sells are usually oak or maple and they are quite affordable. For a wider variety of wood species and bulk options, I personally like checking WidgetCo’s wood plugs collection because they stock everything from flat top to button top plugs in many sizes. A pack of 50 plugs in 3/8 inch size usually costs around 5 to 8 dollars. Super budget friendly honestly.
Making your own requires a plug cutter bit and a drill press. The plug cutter is a special drill bit that cuts round plugs from scrap wood. The big advantage here is that you can cut plugs from the exact same piece of wood as your project. This gives you a perfect grain and color match that is impossible to achieve with store bought plugs.
I personally do a mix. For quick projects I buy plugs. For something special where finish really matters, I cut my own.
Note: plug cutter bits should only be used in a drill press, not a handheld drill. They have no center pilot and can be unsafe if the wood shifts on a handheld.
Woodworking Plugs for Sale: Where to Buy in the USA
If you are in the US and looking for wooden plugs for screw holes, here are your main options.
Home Depot carries basic wood plugs in common sizes. Usually in the fastener or hardware aisle. The wood plugs for screw holes Home Depot sells are decent quality for normal projects.
Amazon has a much wider selection. You can find decorative wood plugs, button top wood plugs, and assorted size packs. Great if you want variety without going to multiple stores.
Rockler Woodworking and Hardware is my favorite for quality. They have specialty plugs in different wood species. If you need matching wood plugs for a specific project, Rockler is the place. You can read more about Rockler Woodworking and Hardware on my other post.
WidgetCo is another good online source if you need bulk quantities.
Decorative Wood Plugs: Make Your Project Look Fancy
One thing most beginner guides dont really talk about is using woodworking plugs as a design feature. Not just to hide things but to actually make your project look more interesting.
Button top wood plugs are perfect for this. They sit slightly above the surface with a small dome. On a rustic wooden bench or outdoor furniture, these look really handsome. Very old school craftsmanship style.
You can also use contrast wood for decorative wood plugs. For example if your project is in pine, you can use a walnut plug. The dark walnut plug will show as a design accent against the lighter pine. This is actually a very popular technique in handmade furniture.
Some woodworkers use decorative wood plugs in rows or patterns intentionally. It adds texture and character to otherwise plain flat surfaces. Very creative option.
If you are doing a project where the finish really matters, like maybe a woodworking bench legs build or a handmade chair, decorative plugs can seriously elevate the look.
Common Mistakes Beginners Make with Woodworking Plugs
Let me save you some headache with these common errors I have seen, and honestly also done myself.
Mistake 1. Using the wrong size plug. The plug must match the hole size exactly. Too small and it will wobble. Too big and you cant even get it in.
Mistake 2. Too much wood glue. This causes glue to squeeze out around the plug when you tap it in. Clean up any squeeze out immediately before it dries.
Mistake 3. Not aligning the grain. Especially with face grain flat top plugs. If the grain runs different direction from the surrounding wood, it will be visible after staining.
Mistake 4. Using a handheld drill with a plug cutter. Dangerous! Always use a drill press for plug cutting.
Mistake 5. Sanding too aggressively. If you sand too hard and too fast you might sand through the plug or create an uneven surface. Go gentle, especially at first.
My Personal Experience with Woodworking Plugs
Honestly when I first started at easydiywood.com I thought plugs were complicated. Like some advanced technique. But after trying it on a basic shelf project, I realised it is actually super beginner friendly. Anyone can do it.
The first time I saw the plug disappear into the wood grain after sanding and staining… man I felt like a real woodworker that day. That moment is why I keep making stuff.
If you are just getting into woodworking, woodworking plugs should be one of the first proper finishing techniques you learn. It immediately makes your projects look 10 times better without spending much money.
Quick Comparison: Woodworking Plugs vs Other Options
Just to make things crystal clear before we wrap up.
Wood putty: cheap, easy, but looks bad after staining, cracks over time. Not recommended for visible areas.
Wood filler: slightly better than putty but same issues with color matching.
Woodworking plugs: real wood, matches grain, durable, looks professional. Best option for visible screw holes in any furniture or shelving project.
If you care about the final look of your project, woodworking plugs win every time.
FAQs About Woodworking Plugs
What is the standard woodworking plug size for most projects?
The most commonly used size is 3/8 inch. It fits most standard screw heads used in furniture and shelving projects and is easy to find at any hardware store.
Can I use woodworking plugs on outdoor furniture?
Yes you can, but make sure to use weather resistant wood like teak or ipe, and seal the plug properly with exterior grade finish to protect from moisture and sun.
What are button top wood plugs used for?
Button top wood plugs are mainly used for decorative purposes. They have a small raised dome and are often left visible as a design feature on handmade furniture and rustic wood pieces.
Where can I find wooden plugs for screw holes near me in the USA?
You can find them at Home Depot in the fastener aisle, at Rockler Woodworking stores, or online on Amazon and WidgetCo in various sizes and wood species.
Conclusion
So there you have it. Woodworking plugs are honestly one of the simplest and most effective finishing tricks in all of woodworking. Whether you are using flat top plugs to hide screw holes cleanly, or button top decorative wood plugs to add some style, this little technique can transform your projects from looking “homemade” to looking actually professional.
Woodworking plugs come in many sizes, the most common being 1/4, 3/8 and 1/2 inch. You can buy them at Home Depot or online, and they are very budget friendly. If you want perfect grain matching, learn to cut your own with a plug cutter bit on a drill press.
For any beginner doing their first woodworking projects, please start using woodworking plugs. Just try it once and you will see the difference yourself.
If you want to learn more about beginner woodworking techniques and budget friendly projects, check out my post on how to get into woodworking for a full starting guide.
Happy building! And as always, take your time, dont rush the glue drying part, and enjoy the process.