Okay so I have to be honest with you. When I first started doing woodwork at home, I thought a woodworking marking gauge was some fancy expensive tool only pro carpenters use. I seriously did not know what it was for almost a whole year. I was using a pencil and a ruler for every single line, wondering why my cuts are never straight. Sounds familiar right?
Then one day I picked up my first woodworking marking gauge from a local hardware store and everything just changed. Like seriously, the difference was night and day for me.
So today I want to share everything I learnt about the woodworking marking gauge in the most simple way possible. No fancy talk, no confusing words. Just plain and easy explanation like I am talking to my freind sitting next to me.
What Exactly is a Woodworking Marking Gauge?
A woodworking marking gauge is a small handheld tool used to draw a straight line on a wood piece, at a fixed distance from its edge. That’s it. Simple na?
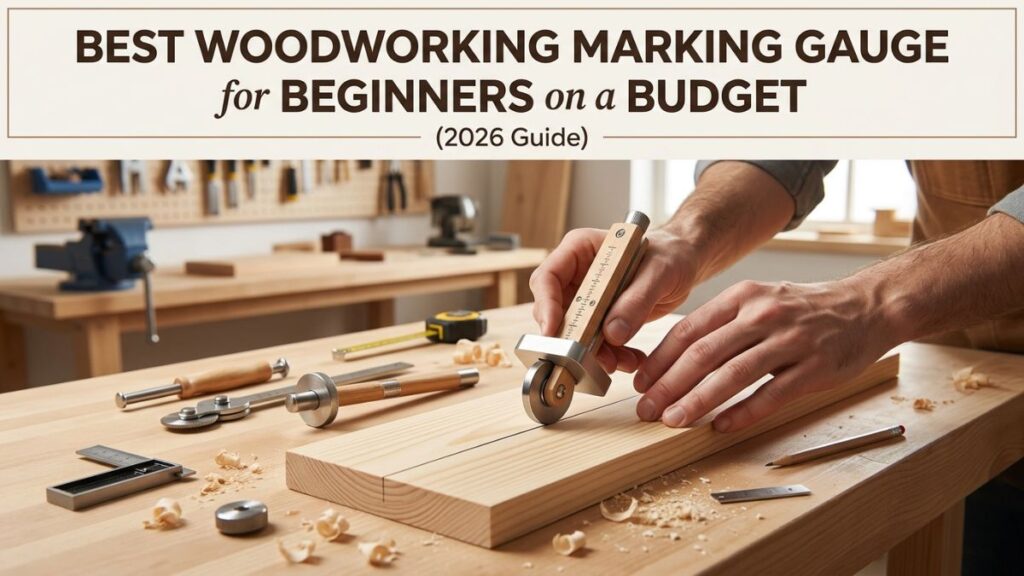
It has three main parts basically. One is the beam (the long stick part), second is the fence or stock (the flat block that sits against the wood edge), and third is the cutting tip (the sharp point that scratches a line on the wood surface).
When you slide the woodworking marking gauge along the edge of your wood board, it leaves a nice clean line every single time. Same distance, same depth. No guessing, no measuring again and again. This is what makes it so useful for beginners honestly.
Think about mortise and tenon joints, dovetail layout, cutting parallel grooves. All of this become so much easier when you got a good woodworking marking gauge in your hand.
Why Beginners Really Need a Woodworking Marking Gauge
So many beginner woodworkers skip this tool. They think “oh pencil is enough.” I did the same mistake for long time.
But here is the real problem. A pencil line is thick, maybe half a milimeter or so. A woodworking marking gauge cuts a line that is thinner than that, almost like a tiny groove in the wood surface. Your saw blade, chisel, or plane can follow that groove so easily. Pencil cannot do this.
Also a woodworking marking gauge is great for repeatability. You set it once and then mark 20 boards with the exact same measurement. No need to measure each time again. This saves so much time during a project.
Another thing I really love, the line made by a woodworking marking gauge cannot be wiped off by mistake like a pencil mark. It is there until you plane it away. So no stress of losing your layout line mid project.
Types of Woodworking Marking Gauge You Should Know About
This part confused me a lot when I was starting. There are few different types and they all look almost same but work bit differently.
Pin Gauge (Scratch Gauge) This is the most basic type. It has a small metal pin that scratches into the wood. Very cheap, very simple. Good for marking along the wood grain. But if you try to use it across the grain it can tear the wood fibres and leave a messy line. Not great for cross grain work.
Knife Gauge (Cutting Gauge) This one has a small blade instead of a pin. Much cleaner lines especially across the grain. Many serious woodworkers prefer this type. A good woodworking marking gauge with knife cutter is really worth buying if you do joinery work.
Wheel Marking Gauge The wheel marking gauge has a tiny circular wheel cutter at the tip. This one is my personal favourite honestly. The wheel rolls and slices through the wood cleanly in both directions, with or against the grain. Super smooth lines every time. Many expensive gauges like the Veritas marking gauge and the Tite-Mark marking gauge use this wheel design.
Mortise Marking Gauge The mortise marking gauge has two pins or two cutters on the same beam. This lets you mark two parallel lines at the same time. Very helpful when doing mortise and tenon joint layout. You dont need to reset the gauge twice. One pass and both lines are done. Very efficient tool for joints.
Best Woodworking Marking Gauge Options for Budget Beginners in USA
Now here is the part everybody wants to know. Which one to buy and where to get it without spending too much money.
Harbor Freight Marking Gauge If you are on super tight budget, the marking gauge at Harbor Freight is one of the cheapest options available. Honestly it does the job for basic projects. The fence is a bit loose sometimes and the pin is not the sharpest out of box, but for a beginner who is just starting out, it works fine. You can sharpen the pin yourself easily. Many beginners in USA pick up this one first and it is totally okay to do so.
Wood Marking Gauge at Home Depot Home Depot also carries some decent basic woodworking marking gauge options. Most of them are pin style or combination type. Brands like Stanley and General Tools are usually available there. Price is around 8 to 20 dollars usually. Good for beginners who want something local and easy to return if needed.
Veritas Marking Gauge Okay now this is the premium level stuff. The Veritas marking gauge from Lee Valley Tools is really well designed honestly. The hardened wheel cutter is super sharp and the fence locks very tight without any play. What I really like is the micro adjustment feature, you can dial in your exact measurement so easily without any struggle. This is one of the best woodworking marking gauge choices out there if you can spend a little more, somewhere around 50 to 70 dollars. Worth every single penny if you are serious about doing good woodwork.
Tite-Mark Marking Gauge The Tite-Mark marking gauge is another very popular option among USA woodworkers. It is known for its very precise wheel cutter and extremely tight fence locking system. Many hand tool enthusiasts swear by this one. It is a bit pricey, around 70 to 90 dollars but quality is excellent. If you want the best woodworking marking gauge and dont mind spending, the Tite-Mark is a fantastic choice.
For most complete beginners though, I would honestly suggest starting with a basic wheel type gauge from Home Depot or even Harbor Freight marking gauge. Learn the basics first. Then upgrade to Veritas or Tite-Mark once you understand what features you actually need.
Can You Use a Woodworking Marking Gauge on Metal?
Interesting question right? I got asked this many times.
Yes there are special versions available. A woodworking marking gauge for metal usually has a harder, sharper carbide tip or a specially hardened scriber point. Regular wood gauges are not ideal for metal surfaces because the pin or wheel can slip on hard metal and wont leave a proper line.
If you ever need to mark metal for a woodworking project that involves both materials, you should look for gauges specifically labeled as dual purpose or use a dedicated metal scriber tool separately. Some wheel type gauges can handle softer metals if the wheel is hardened enough, but its better to use a proper tool for the job.
If you are just doing regular wood projects, dont worry about this. A standard woodworking marking gauge is more than enough.
How to Use a Woodworking Marking Gauge Step by Step
This is where most beginners make mistakes. I made all of these mistakes too so no judgement okay.
Step 1 Set the Distance Loosen the locking screw or thumbscrew on your woodworking marking gauge. Slide the fence to the distance you want to mark from the edge. Use a ruler to check the distance between the fence and the cutting tip. Once you are happy, tighten the screw firmly.
Step 2 Hold the Gauge Correctly Grip the fence or head part of the gauge, not the beam. Keep your fingers wrapped around the stock and let your index finger run along the beam for guidance. This hold gives you much better control and reduces wobbling.
Step 3 Press Fence Against the Wood Edge Place the flat face of the fence firmly against the edge of your wood board. Make sure the whole flat surface is touching. If any part of the fence lifts off the edge, your line will go diagonal and ruin the measurement.
Step 4 Start with a Light Stroke First pass should be gentle. Just a light scratch on the surface. Dont try to go deep in one shot. A light first pass helps the tip stay on track without wandering or slipping sideways.
Step 5 Make the Final Pass Now do second or third pass with a bit more pressure. This deepens the line and makes it clearly visible. Your saw or chisel can now follow this line very accurately.
Step 6 Check Before You Cut Always double check your marked line before cutting. Sometimes the locking screw can slip slightly during use and the measurement shifts. Just verify once with your ruler and you are good to go.
If you are also thinking about building a proper workbench setup, check out my guide on woodworking bench legs which helps a lot when you start doing hand tool work like this.
Common Beginner Mistakes with a Woodworking Marking Gauge
Mistake 1 Holding the Wrong Part Many beginners hold the beam of the gauge. This is wrong. Always hold the fence/stock section. Holding the beam makes it very hard to keep steady pressure against the wood edge.
Mistake 2 Fence Not Fully Flat If even one corner of the fence lifts off the edge, the line will wander. I ruined few boards this way in early days. Make sure full flat surface of fence is against the wood.
Mistake 3 Going Too Deep Too Fast New users often press too hard on first pass. This makes the tip jump sideways or tear the wood. Start light, then deepen the line with follow up passes.
Mistake 4 Dull Tip A dull pin or wheel will drag instead of cut. If you are pressing hard and line is still messy, your tip needs sharpening. For pin type, use a small file or sharpening stone. For wheel type, the wheel itself can be honed or replaced.
Mistake 5 Not Locking the Fence Tight Enough This is so annoying when it happens. You set the measurement perfectly, then in the middle of marking the fence slides and your measurement changes. Always check that the locking screw is properly tightened before each use.
Woodworking Marking Gauge for Different Project Types
Let me quickly share which type suits what kind of work.
For furniture projects like tables and chairs, a wheel marking gauge works excellent. The clean lines it leaves are very helpful for joinery layout.
For small box projects and puzzle boxes, a basic pin type or knife type woodworking marking gauge is fine. Check out some ideas on my woodworking puzzle box post if you want some cool beginner projects to practice on.
For wide panel work, a panel type gauge with longer beam is better. But as a beginner you wont need this right away.
For mortise and tenon work specifically, always use a mortise marking gauge. Those two parallel lines you get in one pass are super helpful and accurate.
Budget Friendly Tips for Buying a Woodworking Marking Gauge in USA
Here are few money saving ideas if budget is tight.
Buy second hand. Many woodworkers sell old gauges on eBay or Facebook Marketplace for very cheap. A 5 dollar vintage Stanley gauge can work amazing after a quick cleanup and sharpening. Seriously.
Check Harbor Freight first before ordering online. The marking gauge Harbor Freight sells is not perfect but for learning basics it does the job fine.
If you are at Home Depot, look for the wood marking gauge in the hand tools aisle. Sometimes they have combo marking and mortise gauges that give you more value for the price.
Avoid very very cheap plastic body gauges. The fence on these warp and give inaccurate lines. At least get a metal body or hardwood body gauge even if the brand is unknown.
Also if you are just starting woodworking in general, I have a full guide on how to get into woodworking that covers all beginner tool shopping tips from scratch.
My Personal Experience with the Woodworking Marking Gauge
I remember the day I finally bought a proper wheel marking gauge. It was nothing fancy, maybe a 25 dollar one from Amazon. But the first time I ran it along a piece of pine board and saw that clean sharp line, I honestly wanted to cry a little. Like all this time I was struggling with pencil and ruler and this tool just made everything so much simpler.
For my magazine rack project last winter I used the woodworking marking gauge for every single layout line. Joints came out clean, cuts were accurate, no sanding needed to fix gaps. That was when I truley understood the value of this tool.
If you are just starting out in DIY wood projects, please dont skip buying a woodworking marking gauge. Even a cheap one will change how you work. Trust me on this one.
Conclusion
So there you go, a complete beginner guide on the woodworking marking gauge from my real personal experience. Whether you pick up a basic marking gauge from Harbor Freight or invest in the Veritas marking gauge or Tite-Mark marking gauge, the important thing is you start using one.
A woodworking marking gauge is honestly one of the most underrated and underused tools in a beginner’s toolbox. Once you start using it, I promise you will wonder how you ever worked without it.
If you have any question about the woodworking marking gauge or want to share which one you are using, drop it in the comments below. I read every single one.
Happy woodworking friends. Keep making things with your hands.
Udit Das easydiywood.com
Frequently Asked Questions
What is a woodworking marking gauge used for?
A woodworking marking gauge is used to scribe a straight parallel line on wood at a set distance from the edge, helping with accurate cuts and joinery layout.
Which is better, pin type or wheel marking gauge for beginners?
A wheel marking gauge gives cleaner lines and works with and against the grain both, so for beginners it is generally a better choice than a basic pin type gauge.
Can I use a woodworking marking gauge on metal surfaces?
A regular woodworking marking gauge is made for wood, but special hardened tip versions exist for metal. For normal DIY wood projects you don’t need the metal version at all.
What is the difference between a marking gauge and a mortise marking gauge?
A regular marking gauge has one cutter and makes one line at a time, while a mortise marking gauge has two adjustable cutters that mark two parallel lines together in one single pass.