
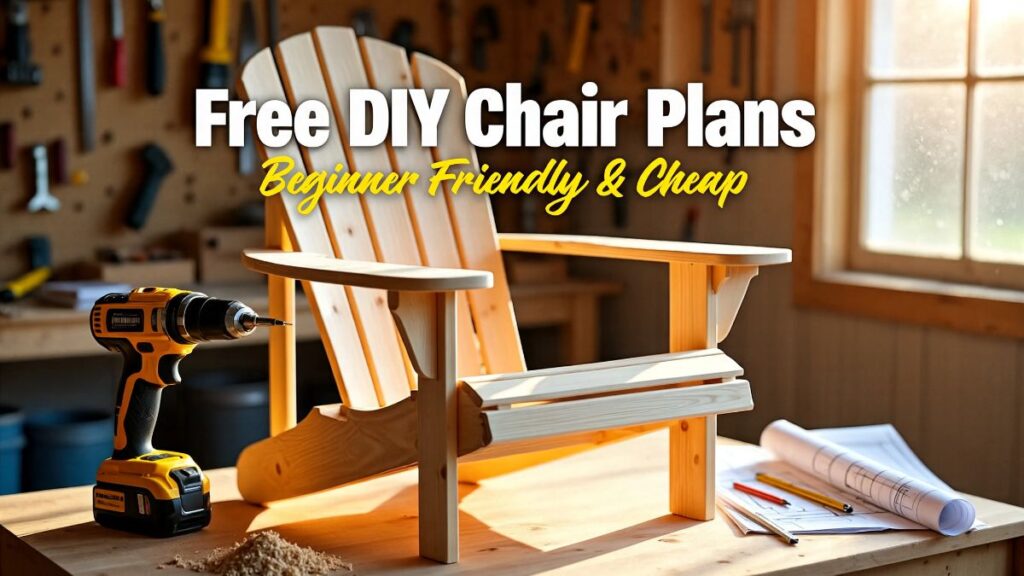
Hey freinds, I am Udit Das and welcome to my blog. So today I want to talk about something that I was really really exicted about for long time. Building your own woodworking outdoor chair at home without spending too much money. I know many of you are thinking “bhai, I dont even know how to hold a saw properly” and trust me I was at same place few months back.
But here is the thing, you dont need to be some expert carpenter or proffesional woodworker to make a nice looking patio chair. You just need some basic lumber, few screws, and little bit of patience. Thats it. I promise you this.
Let me tell you how this whole thing started for me actually.
Why I Started Making My Own Woodworking Outdoor Chair
So last summer, I was looking at patio chairs online and oh my god the prices were crazy. Like $200 to $400 for one single chair? Are you kidding me? And then my freind told me “Udit why dont you just build one yourself, you keep talking about woodworking anyway.”
And I was like hmm thats actually not bad idea. So I started looking for outdoor chair plans free on the internet and found so many options. But most of them were too complicated for a beginner like me. Some needed table saw, some needed fancy jigs, some needed types of wood I never even heard of.
That is when I decided to make a simple woodworking outdoor chair that any beginner can build. And I did it for under $30. Yes you read that right.
What You Need Before Starting Woodworking Outdoor Chair
Ok so before we jump into the building part, let me tell you what all you gonna need. I am keeping this super simple because I know many of you are complete beginners just like I was.
Wood you need:
Around 4 to 5 pieces of 2×4 boards, each 8 feet long. Thats basically it for the main frame. If you want to make it look little fancier you can grab couple of 1×4 boards too for the seat slats. These 2×4 outdoor chair plans free are the most budget freindly way to go.
Tools needed:
A drill or screwdriver, some wood screws (2.5 inch ones work great), sandpaper, a tape measure, and a saw. Now here is a secret, you dont even need a miter saw. A simple circular saw works fine. And if you dont have that, many hardware stores like Home Depot or Lowes will actually cut wood for you if you ask nicely.
I didnt have a proper workshop when I started. I was literally building my woodworking outdoor chair in the driveway. And honestly? It turned out fine.
Choosing the Right Wood for Your Patio Chair
This part is important so pay attention yaa. The type of wood you pick will decide how long your outdoor chair lasts. And since this chair is going to sit outside in rain and sun, you need something that can handle weather.
Now the best option is cedar. It naturally resists rot and bugs and all that stuff. But cedar is expensive compared to regular pine. So here is what I did for my budget freindly approach.
I just used regular pine 2×4 boards from the hardware store. They cost like $3 to $5 each. Super cheap right? The catch is you need to protect them with good outdoor stain or paint. If you skip this step, the wood will start rotting within a year or two. Trust me on this one.
If you want to learn more about choosing affordable wood for your projects, check out my poplar woodworking guide for beginners where I talk about budget wood options in detail.
Some people also use pressure treated lumber for their patio chairs. It works well for outdoor stuff but honestly it can be little tricky for beginners because it is heavier and sometimes has chemicals you dont want to sand without a mask. So ya keep that in mind.
Step by Step Guide to Build Your Woodworking Outdoor Chair
Alright lets get into the actual building part. I am going to break this down into small simple steps. Even if you never touched a power tool before, you can follow this. I promise.
Step 1: Cut Your Boards
First thing first, you need to cut your 2×4 boards according to the measurements. Here is what I used for my chair:
Front legs: 2 pieces at 24 inches each Back legs: 2 pieces at 30 inches each (with a slight angle at top, around 15 degrees) Seat supports: 3 pieces at 20 inches each Back support: 2 pieces at 20 inches Armrests: 2 pieces at 22 inches Seat slats: 5 pieces at 20 inches
Now I know angles sound scary but dont worry. Even I messed up the first time. I cut the back legs straight instead of angled and the chair looked weird. Had to redo them. Its ok, mistakes happen. Thats how you learn this stuff.
Step 2: Build the Side Frames
Take one front leg and one back leg. Connect them with a seat support piece using screws and wood glue. The seat support should be about 15 to 16 inches from the bottom. This gives you comfortable sitting height.
Make sure everything is square. You can use a simple carpenter square for this or even the corner of a book works in emergency haha. Do this for both sides so you have two side frames ready.
Step 3: Connect the Sides Together
Now put both side frames standing up and connect them with the front and back pieces. This is where the chair starts looking like an actual chair and its so exciting let me tell you.
Use 2.5 inch screws for this. Always drill pilot holes first otherwise the wood can split. I learned this the hard way. My first woodworking outdoor chair had a split in the front leg because I was too lazy to drill pilot holes. Dont be like me.
Step 4: Add the Seat Slats
Lay your seat slat boards across the seat supports. Space them out about quarter inch apart for water drainage. This is important because water sitting on the seat will cause the wood to rot faster.
Screw them down from the top. Two screws on each side per slat is enough. Some people like using pocket holes for a cleaner look but honestly for a beginner outdoor project regular screws are perfectly fine.
Step 5: Build the Backrest
Attach the back support pieces between the back legs. Then add your back slats vertically or horizontally, whatever you like better. I went with vertical slats because I think it looks nicer but thats just my opinion.
Step 6: Attach Armrests
Put the armrest pieces on top of the front and back legs. Screw them down. Wide armrests are great because you can put your coffee cup or snack plate on them. I made mine about 3.5 inches wide which is the natural width of a 2×4 board.
Step 7: Sand and Finish
Sand everything smooth starting with rough sandpaper (80 grit) and finishing with finer one (220 grit). Round off any sharp edges especially if you have kids around.
Then apply your outdoor stain or paint. I used a deck stain that I had leftover from another project. Two coats minimum. Let it dry completely between coats. This step is what makes your woodworking outdoor chair last for years outside. If you need help with staining, you can check my staining guide for beginners on the site.
Budget Breakdown for This DIY Outdoor Chair
Ok so lets talk about money because thats the whole point right? Here is what I spent:
4 pieces of 2×4 pine boards (8 feet each): around $16 Box of outdoor wood screws: about $8 Sandpaper sheets: $3 Wood stain (I used leftover, but a quart costs around): $10
Total: roughly $25 to $37
Compare this to buying a ready made wooden patio chair from the store which costs $150 to $400. You are saving SO much money. And the best part? You made it yourself. Theres a different kind of happiness when you sit on something you built with your own hands. I cant even explain that feeling properly.
Common Mistakes Beginners Make with Outdoor Chair Plans
I want to share some mistakes that I made and I have seen others make too. Because when I was searching for woodworking outdoor chair plans pdf and tutorials online, nobody really talked about these things.
Not using outdoor rated screws: Indoor screws will rust within months. Always buy galvanized or stainless steel screws for outdoor furniture. This is something I wish someone told me ealier.
Skipping the wood glue: Screws alone are fine but adding wood glue to the joints makes the chair way more stronger. Any waterproof wood glue works. Titebond III is a popular choice that many woodworkers recommend for outdoor projects.
Wrong seat height: Keep the seat between 15 to 17 inches from ground. Too low and its hard to get up from. Too high and your feet dangle like a kid on a big chair haha.
Forgetting about comfort: A straight 90 degree back is not comfortable at all. Give the backrest a slight angle, about 10 to 15 degrees. This makes a huge difference trust me. You will actually want to sit in the chair then.
Not treating the wood: If you are using regular pine or fir, you MUST apply outdoor finish. No excuses. Otherwise your beautifull chair will look terrible after one rainy season.
Different Woodworking Outdoor Chair Styles You Can Try
Now there are many types of outdoor chairs you can build. Here are some popular ones:
Adirondack Style: This is the classic American outdoor chair with the wide slanted back and low seat. Very comfortable but slightly more complex for beginners. The woodworking outdoor chair plans for this style are available free on many websites.
Modern Boxy Chair: This is what I built. Its basically a box shape with straight lines. Easiest to build and looks clean and modern. Perfect for patio or deck. These patio chair plans PDF are easiest to follow for newbies.
Folding Chair: Great if you dont have much space. These fold flat for storage. Bit more tricky to build because of the moving parts but doable for someone with little bit of experience.
Club Style Chair: Deep seat, wide arms, very comfortable. Needs cushions usually. The 2×4 outdoor chair plans free for this style are popular because they use simple lumber.
Each style has its own charm. For absolute beginners I always recommend starting with the modern boxy style because less cuts, less angles, less chances of messing up.
Do You Need Expensive Tools for Building Patio Chairs?
Short answer is no. Big no actually. When I see some woodworking outdoor chair plans they list like 10 different power tools and I am like bhai who has all these tools at home?
Here is what you actually need and nothing more:
A drill with bits. A hand saw or circular saw. A tape measure. A pencil. Sandpaper. Clamps if you have them, if not use your hands and some creative propping.
Thats literally it. I built my first outdoor chair with just these basic tools. No table saw, no miter saw, no fancy pocket hole jig. Just basics.
Now if you want cleaner cuts and faster work, sure get a miter saw. But for your first project? Dont spend money on tools that you might not use again. See how you feel after building one chair first.
According to Ana White, who has been sharing free woodworking plans since 2009, “a driveway or small patio is plenty to get started.” And I totally agree with that. You dont need a big workshop.
How to Make Your Outdoor Chair Last Longer
So you built your woodworking outdoor chair and its sitting proudly on your patio. Now how do you make sure it lasts for many years?
First thing, keep it off direct ground contact if possible. Put some rubber feet or small plastic pieces under the legs. This prevents moisture from soaking into the end grain of the wood.
Second, reapply your outdoor finish every year or every two years. I know its boring but it takes only 30 minutes and adds years of life to your chair.
Third, if possible bring the chair under cover during heavy rain season or winter. I know not everyone can do this but even a simple tarp cover helps a lot.
Fourth, check for loose screws every few months. Wood expands and contracts with temperature changes so screws can become loose over time. Just tighten them up when needed.
My first woodworking outdoor chair is still going strong after almost a year now. I have re stained it once and tightened a couple screws. Thats all the maintenance it needed so far. Pretty low effort if you ask me.
Can You Really Save Money with DIY Outdoor Chair Plans?
Hundred percent yes. Let me do some quick math for you.
A decent wooden patio chair from a furniture store costs anywhere from $150 to $400. Sometimes even more for teak or cedar ones. If you want a set of four chairs for your patio, you are looking at $600 to $1600 easily.
Now with DIY outdoor chair plans and some 2×4 lumber, you can build one chair for about $25 to $40. Four chairs would cost you $100 to $160 total. Thats massive savings.
And here is the thing that nobody talks about. When you build your own patio chairs, you can fix them easily too. If a board cracks or breaks after few years, you just replace that one board. Try doing that with a store bought chair. You will end up buying a whole new one.
This is exactly why I love DIY woodworking. Its not just about saving money, its about being self sufficient. If you wanna explore more project ideas that can even make you some money, take a look at The Family Handyman’s outdoor chair collection for more inspiration.
Tips for Making Your Woodworking Outdoor Chair More Comfortable
A wooden chair by itself can be little hard on the back after sitting for long time. So here are some tips to make it more comfy:
Add outdoor cushions. You can find standard size seat cushions at any home store for $15 to $25. Make sure to buy ones that are rated for outdoor use so they dont get moldy.
Round off all the edges. Sharp edges dig into your legs and arms. Use sandpaper to round every edge smooth. This small thing makes huge difrence in comfort.
Get the seat angle right. A completely flat seat pushes you forward. A slight tilt backwards, even just 5 degrees, keeps you relaxed and sitting back. When looking at woodworking outdoor chair plans free online, check if they include this tilt.
Make the armrests wide enough. Skinny armrests are useless. You want at least 3 inches wide so you can actually rest your arms on them. The natural width of a 2×4 board works perfect for this.
Also you can check Ana White’s collection of free outdoor chair plans for some great design ideas. She has been sharing plans since 2009 and her community has built thousands of these chairs.
My Honest Experience Building Outdoor Chairs
I want to be real honest with you guys. My first woodworking outdoor chair was not perfect. Not even close. One leg was slightly shorter than the other so it wobbled a bit. The back slats were not evenly spaced. And I accidently put one screw in the wrong spot and it poked through the other side.
But you know what? I still use that chair every evening. I sit on it with my chai and just feel proud. Because I MADE that. With my own hands.
The second chair I built was much much better. My cuts were straighter, my measurements were more accurate, and I even added a slight curve to the backrest for more comfort. Thats how it works. You get better with each project.
So if you are a complete beginner and feeling nervous about starting, please just go for it. Your first woodworking outdoor chair might not win any beauty contest but it will work perfectly fine. And the experience you gain is worth more than any store bought chair.
Conclusion
Building a woodworking outdoor chair at home is one of the best beginner projects you can take up. Its affordable, its rewarding, and its actually not that hard once you start. With just some 2×4 boards, basic tools, and free outdoor chair plans, you can create something beautifull for your patio or backyard.
I hope this guide helped you understand how simple this project really is. Whether you go with Adirondack style or modern boxy design, the important thing is to just start. Dont overthink it. Grab those boards, grab that drill, and start building your own patio chairs this weekend.
If you have any questions or want to share your own woodworking outdoor chair project, drop a comment below. I love seeing what you guys create. Happy building freinds!
FAQs
What is the best wood for outdoor chairs on a budget?
Pine boards from your local hardware store are the cheapest option. Just make sure to apply outdoor stain or paint to protect from weather.
Can I build an outdoor chair with just 2×4 lumber?
Yes absolutely. Many popular DIY outdoor chair plans use only 2×4 boards. Its the most beginner freindly and budget freindly option available.
How long does it take to build a woodworking outdoor chair?
For a complete beginner, expect about 4 to 6 hours including cutting, assembling, sanding and finishing. With experience you can do it in 2 to 3 hours.
Do I need a miter saw to build outdoor patio chairs?
No you dont. A simple circular saw or even a hand saw works fine. You can also get your boards cut at the hardware store if you dont have any saw at home.


Pingback: Red Cedar Woodworking: Cheap Beginner Guide You Must Try
Pingback: Painting Outside Woodwork: Best Beginner Guide