
Okay so I want to ask you something first.
Have you ever seen something and thought wow that looks so hard I could never do that?
That is exactly what happened with me and chess boards. Seriously. I remember seeing one at a freind’s place last year and I just kept staring at it. All those perfect little squares. Dark and light alternating. Some kind of glossy finish on top. I picked it up and checked the bottom and it said handmade. I got so jealous honestly.
Then I came home and searched online. Woodworking chess board. And I went into full panic mode because every tutorial I saw was using walnut wood, maple wood, a big table saw setup, fancy clamps, expensive router bits… I was like bhai this is not for me.
But I still tried. And failed a little. Then tried again. And now here I am writing about it for you.
So if you are someone sitting in USA or anywhere really, who wants to make a chess board with basic tools and not spend a lot of money, this post is for you. No fancy stuff. No perfect workshop. Just real beginner stuff that actually works.
My Very First Woodworking Chess Board Was Actually Terrible
No joke. My first one looked like the squares were made by a kid with a crayon ruler. Uneven gaps between the wood strips, glue was coming out from everywhere like toothpaste, and I had sanded so aggressively in one corner that the wood got thin there.
But here is the thing. I still have it. I keep it in my room. Not because it is pretty but because it reminds me that I made something with my own hands even when I had no idea what I was doing.
That is what I want you to feel too when you finish yours.
And trust me this project is way more doable than it looks. People think woodworking chess board is like some advanced level project only expert woodworkers can do. That is not true at all. The technique is actually simple once someone explains it properly. Which is what I will do here.
So What Wood Should You Actually Buy If You Are Broke Like Me
This is the part where most tutorials on Google just say walnut and maple and move on. And I understand why because those two look beautiful together. Dark brown walnut next to cream color maple. Classic.
But walnut is not cheap. Specially not in USA lumber yards right now. So here is what I did for my budget friendly woodworking chess board and it honestly turned out great.
I bought pine. Just regular pine from Home Depot. One board for the light squares. Another board of same pine which I stained dark using a cheap wood stain can. Two tones from one type of wood. Cost me maybe 18 dollars total including the stain.
Now another option which I tried later is poplar and birch. These two have naturally slightly different tones and they are not as expensive as exotic hardwoods. Poplar is greenish grey and birch is more pale yellow so when you put them side by side the contrast is visible enough for a chess pattern.
If you have a little more budget then oak and ash combo is also very nice and still stays under the expensive side compared to walnut.
Point is you dont need the most expensive wood to make a beautiful board. Honestly just pick two affordable boards that look different from each other and you are good to go. Dont overthink this part. Just go to the store, look at what is available, pick two and come home.
Tools List and Please Dont Get Overwhelmed
I am going to keep this very simple. You do not need a professional woodworking shop for this project.
A circular saw is enough for cutting strips. Yes even a basic 7 inch circular saw from Ryobi or whatever brand you have works fine. You just need a straight edge guide which you can make yourself from a scrap piece of wood.
Wood glue is next. Yellow PVA glue or Titebond II which is available everywhere. Get a medium size bottle.
Clamps. You need at least 4 to 6 bar clamps or pipe clamps. These hold your strips tight while glue dries. If you dont have clamps you can use masking tape trick but clamps are better honestly.
Sandpaper. Get a few sheets of 80 grit, 120 grit and 220 grit. Nothing fancy. Just the sandpaper sheets you find in any hardware store.
A ruler and pencil. And some kind of finish. Polyurethane from a spray can or danish oil from a tin. Either works.
That is really it. No table saw needed. No router needed. No jointer or planer needed. Just these basic things.
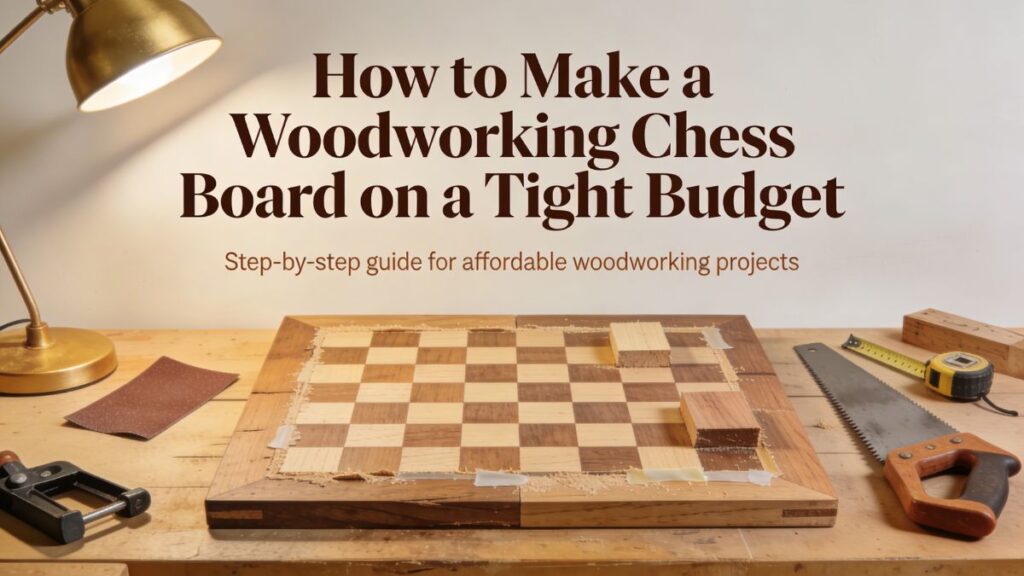
Okay Now the Actual Process of Building the Woodworking Chess Board
Alright this is the part that looks confusing when you read about it online. Let me explain it in the most simple way.
The whole process has two glue ups. Two times you glue wood and wait for it to dry. That is the main thing to remember.
So first you cut your two wood boards into long strips. Each strip should be around 2 inches wide. The length doesnt matter much at this stage, just keep them long. You need 4 strips of each wood type. Total 8 strips.
Lay them flat on your workbench and alternate them. Light strip, dark strip, light strip, dark strip and so on. Put glue on the long edge of each strip where they touch each other and press them all together. Clamp everything tight and leave it overnight. Seriously overnight. Dont rush this.
Next morning you will have a big flat panel. It will have vertical stripes of dark and light wood running along the length.
Now here is the clever part that I found really amazing when I first learned it.
You take that glued panel and cut it crossways into more strips. Same 2 inch width again. Each new strip will now have little alternating squares on it. Then you take every second strip and flip it around. When you do that the squares suddenly line up into a perfect chess board pattern. Dark next to light, light next to dark. 8 by 8 squares.
Then you do your second glue up. Glue these new strips edge to edge just like before, clamp and wait again.
When it dries… your chess board pattern is right there in front of you. 64 squares. It is genuinley one of the most satisfying things I have ever seen in my life and I am not even exaggerating.
After that you sand everything flat starting from 80 grit going to 120 then 220. Take your time on sanding. This step makes a huge difference in how the final board looks.
Then apply your finish in 2 or 3 thin coats. Let each coat dry before putting the next one. Done.
The Drawer Version of the Chess Board
So some people want to store their chess pieces inside the board itself. Smart idea actually because small pieces get lost so easily.
A woodworking chess board with drawers basically means you build a shallow wooden box under the main board and add one or two small drawers that slide in and out from the sides.
The box itself is just four pieces of wood joined at corners. Nothing complicated. Then you make two small rectangular drawer boxes that fit inside with a little gap for easy sliding.
This version takes more time and more wood and little bit more skill. So my honest suggestion is make the flat board first. Get comfortable with the two glue up process. Then when you feel ready try adding the drawer box.
I made my drawer version on my third chess board and it came out pretty decent. Not perfect. But usable and it looks really nice when gifted to someone.
Chess Board Plans PDF and Where to Actually Find Them
Okay so a lot of beginners ask me about chess board plans PDF or woodworking chess board plans PDF free download options. Fair question.
There are genuinley some free ones available online. Woodworking club websites and some woodworking magazine sites share their older plans for free as downloadable PDFs. These chess board woodworking plans PDF files usually come with a full cut list, measurements in both metric and imperial, and some even have exploded diagrams showing each piece separately.
If you search something like woodworking chess board plans PDF on Google you will find a mix of free and paid options. The free ones are enough for a basic flat board. If you want the drawer version a paid plan from Woodsmith or similar sites is worth the few dollars because the instructions are much more detailed.
For a kit option, a woodworking chess board kit is basically pre cut pieces you just glue and finish. It costs more than buying raw wood but it removes the cutting step which can be scary for first timers. If cutting feels too much right now a kit is a perfectly fine way to start.
Can You Actually Sell a Chess Board You Made Yourself
Short answer yes, absolutly yes.
People in USA love buying handmade wooden items. Etsy alone has hundreds of listings for handmade chess boards and they sell from 60 dollars to even 300 dollars depending on wood quality and finish.
If you make a nice walnut and maple board with a drawer it can easily sell for 100 to 150 dollars. Even a simple pine board with good sanding and a clean polyurethane finish can sell for 40 to 60 dollars at local craft fairs or on Facebook Marketplace.
A woodworking chess board for sale listing with good photos on Etsy does surprisingly well specially around Christmas time and Fathers Day. I have seen handmade boards sell within hours of being listed.
If selling your woodwork projects sounds interesting to you I have a detailed post about easy diy wood projects to make money where I talk about which projects sell best and how to price them properly.
Mistakes I Made So You Dont Have To Make Them
Let me be very honest here.
I put too much glue the first time. Like way too much. It was squeezing out from every single joint and making a huge mess. A thin even coat on each edge is all you need. Not a thick blob.
I also rushed the drying time. I thought maybe 2 hours is enough and tried to move the panel before it was ready. One strip shifted slightly and the pattern got messed up. Now I always wait overnight minimum.
Another mistake was jumping from 80 grit sandpaper directly to 220 grit. Skipping grits leaves little scratch marks in the wood that show up clearly when you apply finish. Always go through each grit step even if it feels slow.
And I forgot to finish the bottom of the board my first time. Applied nice polyurethane on top but left the bottom raw. The board absorbed moisture from the workbench and started to slightly warp over few weeks. Apply finish on all sides of the board. Top, bottom, all four edges.
Why Woodworking is Actually Good For You
This might sound random but I genuinley believe woodworking is one of the best hobbies you can pick up.
When I am in the middle of cutting strips or sanding a surface my brain just goes quiet. No phone. No social media. No stress from work. Just wood and tools and focus. Its like meditation but you get furniture at the end.
I actually wrote a full post about this which you should check out if you are curious about the mental health side of woodworking. My woodworking therapy beginners guide explains how this hobby helps with anxiety and stress in a really simple and honest way.
FAQ
How many squares does a chess board have?
64 squares total, 8 rows and 8 columns with alternating colors. This size stays standard for all chess boards worldwide.
What is best wood for a beginner who has low budget?
Pine is the cheapest and easiest to cut. You can stain one batch dark and keep the other natural to get your two color chess pattern.
Can I make this chess board without a table saw?
Yes you can. A basic circular saw with a straight edge guide is more than enough to make clean cuts for your strips.
How long does building a chess board take?
Most beginners finish in one full weekend. Around 6 to 10 hours total but a big chunk of that is just waiting for glue to dry.
Where can I find chess board woodworking plans PDF for free?
Search for woodworking chess board plans PDF free download and you will find several club and magazine websites that share older plans for free.
What finish should I use on a wooden chess board?
Danish oil or polyurethane both work well. Apply 2 to 3 thin coats and let each one fully dry before the next. Spray polyurethane is easiest for beginners.
Is woodworking chess board with drawers hard for beginners?
A little more complex than a flat board but not impossibly hard. Build the flat version first and then try adding a drawer box on your next attempt.
Can I sell a homemade chess board on Etsy?
Absolutly yes. Handmade chess boards sell very well on Etsy specially in the USA market and specially during gift giving seasons.
Final Thoughts From Udit Das
Look I am just a regular person who got obsessed with making things from wood. I am not a proffesional. My workshop is a small corner of my garage. My tools are basic. My budget is always tight.
But I have made chess boards that people genuinley love. People have asked me to make boards for them as gifts. One freind literally paid me 80 dollars for a poplar and birch board with a simple drawer which took me maybe one weekend to build.
This woodworking chess board project changed how I see DIY woodwork. It showed me that even a complete beginner can make something beautiful and useful without spending a fortune.
So please just start. Buy the wood. Cut the strips. Mess up a little. Sand it down. Try again. The only way to get better at this is to just do it and not wait until you feel ready because honestly that feeling of readyness never fully comes. At least it never did for me.
Go make your chess board. I really hope you do.
And if you want to explore more beginner projects before trying the chess board you should definitely check out my diy woodworking projects for beginners page which has lots of simple ideas to help you practice basic skills first.
Also for reference on wood types and which species work well together I personally like using The Wood Database at wood-database.com which is a completely free resource and very helpful when you are choosing your materials.
And for video based learning the Woodworkers Guild of America at wwgoa.com has some really good beginner content too.
Happy woodworking from me, Udit Das, from easydiywood.com. See you in the next post.

Pingback: Woodworking Fastener Guide That Saves Money for Beginners
Pingback: How I Built My First Woodworking Stool on a Cheap Budget
Pingback: Caught Looking Woodworks Email: Best Way to Tim Miller
Pingback: Easy Woodworking Puzzle Box Guide for Broke Beginners