Ok so let me tell you something honest. My workshop was a total mess few months back. Like seriously, wood pieces here and there, plywood sheets falling on each other, scrap wood just thrown in corner. I was so frustrated yaar. Then I started searching for woodworking cart plans online and honestly? Most of them were either too complex or too expencive for a beginner like me. So I figured out my own cheap woodworking cart plans and today I am sharing everything I learned with you.
My name is Udit Das, I run easydiywood.com and I am just a regular guy who loves making stuff from wood at home. I am not some proffesional carpenter or anything. Just a hobbyist who enjoys weekend projects. So if you are a complete beginner like I was, dont worry. These woodworking cart plans are made just for you.
Why You Even Need Woodworking Cart Plans in Your Shop
Let me ask you something. How many times you have tripped over random wood pieces in your garage? Or spent 20 minutes looking for that one board you kept somewhere? Ya same thing happened with me so many times.
A woodworking cart is basically a moving storage thing on wheels where you can keep all your lumber, scrap pieces, plywood sheets and offcuts nicely organized. The best part is it has wheels so you can roll it around wherever you need.
I know what you are thinking. Why not just buy a metal rack from store right? Well those things cost like 150 to 300 dollars easily. But if you follow simple woodworking cart plans you can build one for 30 to 50 dollars only. Sometimes even less if you use leftover wood. Thats why having good woodworking cart plans matters so much for beginners.
What Kinds of Woodworking Cart Plans Are Out There
Before we go into the actual building part, let me quickly tell you about different types of woodworking cart plans. Because not everyone needs same kind of cart na.
Simple Scrap Wood Cart is the most basic one. Just a box on wheels basically. You throw all your small cutoff pieces in it and roll it under your workbench when not using. A scrap wood cart with wheels is perfect if you dont have much space.
Lumber Storage Cart is bigger one. This one has sections for different sizes of wood. Like one side for long boards and other side for plywood sheets. If you search for lumber storage cart plans PDF free download online you will find many options but most are complicated.
Tool Cart or Shop Cart is more like a workstation on wheels. It has drawers and shelves for keeping your tools organized. Pretty handy but little more advanced to build.
Mobile Wood Storage Cart is my favourite. It combines lumber storage with mobility. You can push it around your garage or workshop depending on what you are working on that day.
For beginners I always say start with the simple scrap wood cart first. Once you get confidence then try the bigger woodworking cart plans. If you want more beginner project ideas, check out my post on DIY woodworking projects for beginners where I share many easy builds.
Materials You Will Need for These Woodworking Cart Plans
Ok so here is the thing. You dont need fancy expensive wood for building a cart. It is going to hold your messy wood pieces not sit in your living room right? So keep it simple and cheap.
Here is what I used for my basic woodworking cart plans build:
One sheet of 3/4 inch plywood (around 35 to 45 dollars)
Four to six 2×4 boards 8 feet long (around 3 to 5 dollars each)
Four heavy duty caster wheels (around 15 to 25 dollars for pack)
Box of 2.5 inch wood screws (around 8 dollars)
Wood glue (around 5 dollars)
Total cost comes to about 50 to 80 dollars depending on where you shop. But wait. If you already have some scrap plywood and leftover 2x4s from old projects then you can literally build this for under 20 dollars. Just buy the wheels and screws.
I actually built my first cart using mostly leftover wood from a deck project my neighbour threw away. So ya, free scrap wood storage cart plans are great but free wood is even better haha.
Tools Required (Beginner Friendly Only)
Now I know many of you dont have a full workshop setup. And thats totally fine. You can follow most woodworking cart plans with just these basic tools:
Circular saw or even a handsaw if you are patient
Drill and drill bits
Measuring tape
Pencil and square
Pocket hole jig is nice to have but not must
Sandpaper
Thats it. No table saw needed. No fancy miter saw required. When I built my first mobile wood storage cart I only had a circular saw and a cheap drill from Amazon. Worked perfectly fine.
If you want to know more about what machines and tools are worth buying as a beginner, I have written a detailed guide on woodwork machines for beginners on a budget that might help you.
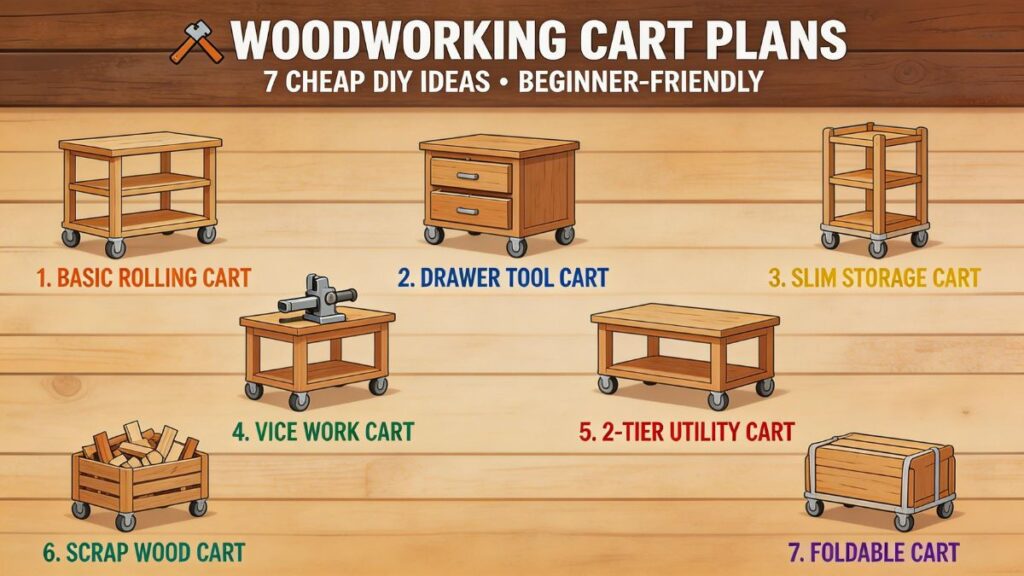
7 Budget Friendly Woodworking Cart Plans for Complete Beginners
Alright now lets get to the fun part. Here are seven different woodworking cart plans that I have either built myself or studied closely. All of them are beginner friendly and wont break your bank.
1. The Basic Box Cart on Wheels
This is simplest one and what I recomend for your very first build. Just think of it as a big wooden box sitting on four caster wheels.
Take a piece of plywood, cut it into a rectangle for the base. Cut four sides from plywood or 2x4s. Screw everything together. Flip it over and attach four wheels on corners. Done.
The whole thing takes maybe 2 hours if you are slow like me. And it costs under 30 dollars if you have some leftover plywood lying around. This is what free scrap wood storage cart plans are all about. Keep it simple, keep it cheap.
2. The A Frame Lumber Cart
This one is very popular and I have seen it on so many YouTube channels. The idea is you build a base with wheels and then put A shaped frames on top. Wood boards lean against both sides of the A frame.
The cool thing about this design is it holds a LOT of lumber in a small space. Like seriously you can fit long boards, short pieces and even plywood sheets all in one cart. Most lumber storage cart plans PDF free download versions follow this same basic concept.
I built mine about 6 feet long and 24 inches wide. It sits against my garage wall and I just pull it out when I need something. The A frame has a 5 degree tilt which keeps the wood from falling over. Trust me that small angle makes big diffrence.
3. The Divided Scrap Wood Cart
Ok this one is my personal favourite because I am that kind of person who keeps every small piece of wood. You never know when you need it right?
The divided cart has different compartments for different sizes. One section for long thin pieces, one for short chunks, one for wider boards. Its like having a filing cabinet but for wood.
You build the base same as the box cart. Then add vertical dividers using plywood strips. Add wheels at bottom. Simple. The dividers make it super easy to find what you need without digging through a pile. Among all woodworking cart plans free options this divided design gives you the best organization.
4. The Plywood Sheet Cart
If you work with plywood a lot then this one is must have. Plywood sheets are heavy and akward to handle. Having a cart that holds them vertically makes life so much easier.
Build a flat base on wheels with tall supports on sides. Lean your plywood sheets between the supports. Some people add a center divider too so sheets dont lean on each other.
I keep my plywood sheet cart near my garage door so when I bring new sheets home from the store I just slide them right in. No lifting no struggling. These kind of woodworking cart plans are lifesavers for people who deal with sheet goods regularly.
5. The Combo Cart with Shelves
This is little more advanced but still totally doable for a beginner. You combine the A frame design with some flat shelves on one side.
The shelves are great for storing smaller offcuts, hardware boxes, and random stuff you always need but can never find. I put three shelves on mine with about 10 inches gap between them.
The woodworking cart plans for this combo style might look scary at first but break it down step by step and its actually not that hard. Just build the base first, then add the A frame, then add shelves one at a time.
6. The Compact Mini Cart
Not everyone has a big garage. Some of us work in small spaces like a one car garage or even a balcony. So this mini cart is designed for tight spots.
Its basically 2 feet by 2 feet base with vertical storage going up about 3 feet. Small footprint but still holds decent amount of wood. The compact size means you can tuck it in a corner when not working.
This design works really well as a mobile wood storage cart for apartment woodworkers. Ya thats a real thing, I know few people who do woodworking on their balconies.
7. The Multi Purpose Rolling Workstation
Ok this last one is the most ambitious on the list. It works as a storage cart AND a work surface. The top is flat so you can use it for assembling projects or as extra table space.
Underneath you have shelves and compartments for lumber storage. Add some hooks on the sides for hanging clamps or tools. Put heavy duty locking casters on bottom so it doesnt roll away while you are working on it.
This is what I eventually upgraded to after starting with the basic box cart. And honestly out of all the woodworking cart plans I have tried, this one is the most useful thing in my whole workshop now.
Step by Step Guide to Build Your First Cart
Let me walk you through how I built my first woodworking cart. This is the basic A frame style because I think its the best balance of easy and usefull.
Step 1: Cut Your Base
Take your plywood sheet and cut a piece thats about 24 inches wide and 6 feet long. This will be the floor of your cart. If 6 feet is too big for your space, make it 4 feet. No rules here.
Step 2: Build the Base Frame
Cut four 2×4 pieces to match the edges of your plywood. Screw them around the plywood to make a strong frame. Think of it like putting a picture frame around the plywood but on the bottom side.
Step 3: Attach Caster Wheels
Flip the whole thing over and screw four heavy duty casters on the corners. Make sure you get wheels that can handle atleast 200 to 300 pounds total. Wood gets heavy fast when you start piling it up.
Pro tip from my experience, get locking casters. At least two of them should have locks. Otherwise the cart will roll away while you are loading wood on it. Happened to me once and the whole thing rolled into my car bumper. Not fun.
Step 4: Build the Vertical Supports
Cut 2x4s to about 4 feet long for the vertical pieces. You need pairs of them. Angle the tops slightly so they lean toward each other making that A shape.
Connect each pair at top with a short 2×4 piece. Then screw the bottom of each pair into the base frame. Space the A frames about 2 feet apart along the length of the cart.
Step 5: Add Optional Shelves
If you want shelves between the A frames, cut plywood pieces to fit and screw them to horizontal 2×4 supports. I added three shelves on one side of my cart for storing shorter scraps.
Step 6: Sand and Finish
Give everything a quick sand so you dont get splinters. You can paint it or leave it raw. I just put one coat of cheap polyurethane on mine to protect from moisture. Nothing fancy.
And thats it! Your first cart from these woodworking cart plans is ready. Load it up and enjoy the feeling of actualy having an organized workshop for once.
Common Mistakes Beginners Make With Woodworking Cart Plans
Let me save you some headache by sharing my mistakes.
First mistake I did was buying cheap thin casters. Those tiny wheels could not handle the weight and they broke within a month. Spend little extra and get heavy duty ones. This is one area where going too cheap will bite you later.
Second mistake was not making the base strong enough. I used thin plywood without the 2×4 frame underneath and the base started bending when I loaded heavy boards on it. Always build a proper frame even if it feels like overkill.
Third mistake, I forgot to measure my garage door width before building the cart. So my 6 foot long cart could not go through the side door. Had to use the main garage door every time. Measure your space first people!
Also I want to mention, if you are looking for woodworking cart plans pdf or woodworking cart plans pdf free download, there are some good resources on sites like Ana White and Kreg Tool’s free plan library. Both of these have nice beginner friendly options you can print out and follow.
How Much Money Can You Actually Save
Real talk here. A decent metal storage rack from Home Depot or Lowes costs between 100 to 300 dollars. And those arent even that great for lumber storage honestly. They are designed for general stuff not specifically for wood boards and sheets.
When you follow woodworking cart plans and build your own, the total cost is somwhere between 30 to 80 dollars. If you use scrap wood and leftover materials from old projects, it can be almost free. Thats the beauty of free lumber cart plans, they save you real money.
Plus when you build it yourself you can customize it exactly for your needs. My cart is designed for the specific size of my garage. No store bought solution would fit that perfectly.
And there is one more thing nobody talks about. Building the cart is itself a great learning project. You practice measuring, cutting, drilling, and assembling. All the basic skills you need for bigger projects later. So its like a two in one deal. You get organized workshop AND you get better at woodworking.
If you are looking for more ways to make money from your woodworking hobby, check out this post about easy DIY wood projects to make money.
Tips to Make Your Cart Last Longer
Few quick tips from my exprience that I wish someone told me earlier.
Use exterior grade plywood if your cart will be in a garage thats not climate controlled. Regular indoor plywood can warp when it gets humid.
Apply some kind of finish or sealant even if its just basic polyurethane. It protects the wood and makes it last years longer.
Tighten the screws every few months. With all the loading and unloading things tend to get loose over time.
If you notice one wheel is wobbly, replace it immediately. A wobbly wheel puts extra stress on the base and can cause bigger problems.
Dont overload one side only. Distribute the weight evenly across the cart. I learned this the hard way when my cart tipped over because I put all the heavy plywood on one side.
Wrapping Up My Thoughts on Woodworking Cart Plans
So there you have it friends. Seven budget friendly woodworking cart plans that any beginner can build without spending too much money or needing fancy tools. I genuinly believe that having solid woodworking cart plans is the first step to setting up a proper workshop.
It doesnt have to be perfect. My first cart was ugly honestly. But it worked and thats all that matters. You can always improve and build a better one later once your skills get better.
Whether you go with a simple scrap wood cart with wheels or a full on lumber storage cart with shelves and dividers, the important thing is to just start building. Stop overthinking, grab your favourite woodworking cart plans from this list and pick up that saw.
If you found this helpful, share it with your freinds who are also into woodworking. And feel free to drop a comment if you have questions about any of these woodworking cart plans. I read every single comment and try to reply as fast as I can.
Happy building everyone!
Frequently Asked Questions
How much does it cost to build a woodworking cart at home?
A basic woodworking cart can be built for around 30 to 80 dollars using plywood and 2×4 boards. If you use scrap or leftover wood the cost drops even more, sometimes under 20 dollars.
Can I build a lumber storage cart without a table saw?
Yes absolutely. A circular saw and a drill are all you really need. Many free lumber cart plans are designed to be built with just these two basic tools.
What size caster wheels should I use for a mobile wood storage cart?
Go with 3 to 4 inch heavy duty caster wheels rated for atleast 200 pounds total weight. Get ones with locking feature so the cart stays in place when you are loading wood.
Where can I find woodworking cart plans PDF free download?
Websites like Ana White and Kreg Tool offer free downloadable plans for beginners. You can also find many options on YouTube where builders share their plans in video description for free.