
Hey freinds, I am Udit Das and welcome to easydiywood.com! So today I want to talk about something that I have been really excited about. My first ever woodworking bookcase. Yep, you read that right. I built a bookcase with my own hands and honestly? It was not perfect. But thats the whole point na. You dont need to be some expert carpenter to make one. Trust me on this.
Look, I know how it feels when you see those fancy bookcases in shops costing like $300 or $500 and you think hmm maybe I should just buy one. But wait wait wait. What if I tell you that you can build your own woodworking bookcase for less than $50? Sounds crazy right? But its true and I did it. And today I am going to share everything with you.
Why I Decided to Build My Own Woodworking Bookcase
Ok so let me tell you a little story. Last year my room was a total mess. Books everywhere, on the floor, on the bed, even near the kitchen. My mom was getting angry every day haha. So I thought ok let me buy a bookshelf from the store. But bro the prices? I was shocked. Even the cheap looking ones were like $150 or more. And they looked so weak like they would break in few months only.
So I said to myself, Udit you are a DIY guy. Why not just build one yourself? And thats how this whole journey started. I started looking for free bookshelf plans woodworking communities share online and I found so many options. Some were too complicated, some needed expensive tools. But finally I found a simple plan that worked for me as a complete beginner.
Choosing the Right Wood for Your Woodworking Bookcase
This part is very importent and I want to be honest with you here. When I first went to the lumber store I had no idea what to pick. There were so many types and I was standing there like a confused kid in a candy shop.
Pine is probably one of the cheapest woods you can find. Usually it runs around $2 to $3 per board foot which is really affordable. For beginners making a woodworking bookcase I always say go with pine. Its cheap, its light, and its easy to cut and sand. You dont need anything fancy for your first project okay?
Now if you want to know more about beginer freindly woods, I wrote a whole guide about poplar woodworking for beginners which is another great budget option. Poplar takes paint really well too if you want to color your bookcase later.
Here are woods I recomend for a budget woodworking bookcase:
Pine is my number one pick. Soft, cheap, and you get it at any Home Depot or Lowes easily. Most simple bookcase plans PDF files use pine because its so forgiving with mistakes.
Plywood is another solid choice. Its strong, comes in big sheets, and doesnt warp as much as regular wood. You can build a whole woodworking bookcase from just one sheet of 3/4 inch plywood and still have leftovers.
MDF works good too but I dont love it honestly. It gets damaged with water super fast. Like even a small spill can mess it up. For a bookcase though its fine since bookshelves stay inside the house only.
Tools You Actually Need (Not What YouTube Shows You)
Ok this is where most beginners get scared. They watch YouTube videos and see people with $5000 worth of tools and think oh I cant do this. But listen, for a simple woodworking bookcase you need very basic stuff only.
Here is my honest tools list:
A circular saw or even a hand saw works. I built my first woodworking bookcase with just a circular saw that I got second hand for $25. You dont need a table saw for this project. If you have one thats great but its not compulsary at all.
A drill is something you defintely need. A basic cordless drill with some screwdriver bits is enough. I use a cheap one that I bought from Amazon for around $35 and it still works fine after many projects.
Measuring tape and a pencil. Sounds silly right? But proper measurments are everything in woodworking bookcase projects. Measure twice cut once, thats what everyone says and its actually true.
A square tool for checking your angles. If your bookcase is not square it will look wonky and might even tip over. Dont skip this one please.
Sandpaper in 120 grit and 220 grit. Start with the rough one first to remove big scratches and bumps, then go smooth with the fine grit for a nice finish.
Thats basicaly it. No fancy tools, no expensive machines. If you want to learn about more woodworking tools and machines, check out my post on woodwork machines for beginners.
My Simple Woodworking Bookcase Plans (Step by Step)
Alright now the fun part. Let me walk you through how I built my woodworking bookcase. This is a very simple bookshelf plans approach that anybody can follow. Even if you never touched a saw before in your life.
Step 1: Plan Your Size
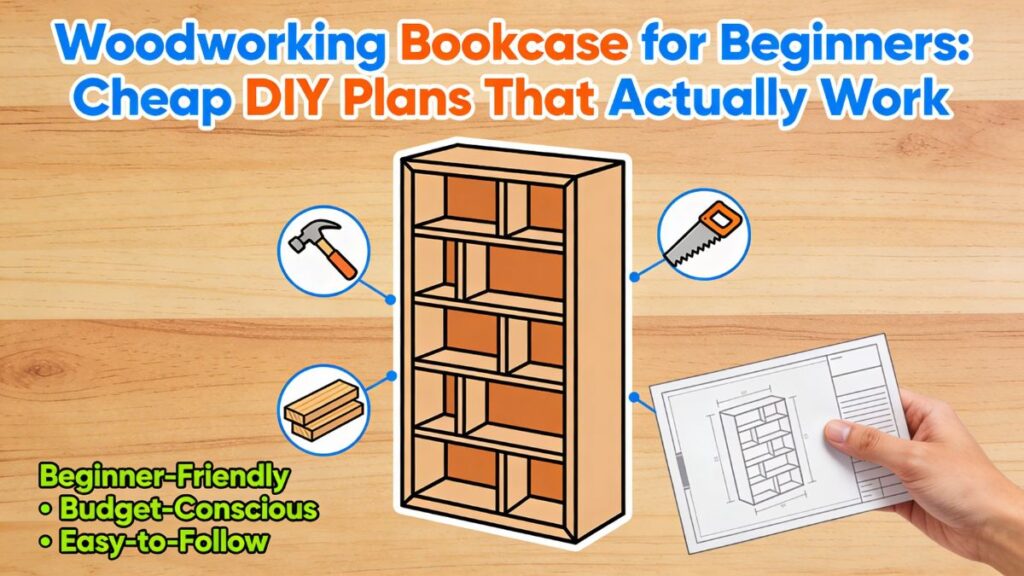
Before you cut anything, decide how big you want your woodworking bookcase. For my first build I went with something small. About 36 inches tall, 24 inches wide, and 10 inches deep. This size is perfect for a small room or home office. Its not too heavy, not too big, and you can move it around easily.
Write down your mesurements on paper. Draw a rough picture if you can. It doesnt need to look beautiful, just something to guide you while cutting. Many woodworking bookcase plans PDF files give you exact mesurements but honestly for a simple build, your own sketch works perfectly fine.
Step 2: Get Your Wood Cut
Now go to your local lumber store and get the wood. For my 36 x 24 x 10 woodworking bookcase I needed:
Two side panels, each 36 inches tall and 10 inches deep. Three shelf boards each 22.5 inches long and 10 inches deep. And one back panel if you want to add, I used a thin 1/4 inch plywood for the back.
Many stores will cut the wood for you for free or for a very small charge. This is a great tip for beginners because cutting straight lines at home can be tricky when you are just starting out. Take advantage of this servise.
Step 3: Sand Everything First
Before putting anything togather, sand all your pieces. I know its boring work and nobody enjoys it. But trust me when your woodworking bookcase is smooth and nice, it looks so much better. Plus sanding helps the paint or stain stick properly.
I spend about 30 to 40 minutes sanding everything. Start with the rough sandpaper first, then go smooth. Wipe the dust off with a damp cloth before moving to the next step.
Step 4: Mark Your Shelf Positions
On both side panels mark where you want your shelves to sit. I did mine at equal spacing, about 10 inches apart. Use your square tool to draw straight lines across. These marks tell you exactly where to attach the shelves.
Now here is a mistake I made on my first woodworking bookcase. I measured from the top on one side and from the bottom on the other side. So my shelves were totally uneven haha. Dont do that okay? Always mesure from the same point on both sides. I learnt this the hard way.
Step 5: Join Everything Together
For joinery you have few options. Pocket holes are super useful specially when you are joining the end of one board to the face of another board. I used pocket holes for my woodworking bookcase because its the easiest method for beginners.
If you dont have a pocket hole jig thats also fine. You can simply use wood screws from the outside. Just make sure to drill pilot holes first so the wood doesnt split. Pre drilling is very importent with pine because it cracks easily.
Put some wood glue on the joint area before screwing. The glue makes the joint super strong. Once the glue drys your woodworking bookcase will be very solid and sturdy.
Step 6: Attach the Back Panel
Cut your thin plywood to fit the back of your woodworking bookcase. Nail it on with small finishing nails or use a brad nailer if you have one. Adding a back panel gives your whole structure extra support and keeps everything square and tight.
The back panel also stops books from falling behind the shelf which is super anoying when it happens. Plus it makes the whole thing much more rigid and less wobbly. I skipped this on my first build and regretted it so much.
Step 7: Finish Your Bookcase
Now the final step. You can paint it, stain it, or leave it natural. For my first woodworking bookcase I used a simple walnut stain from Minwax. It cost like $8 for a small can and it was more than enough. Two coats of stain, let it dry overnight, then one coat of polyurethane for protection.
If you want to paint instead, use a good primer first and then your favorite color. I have seen some beautiful white woodworking bookcase builds that look so clean and modern. Really depends on your room style and what you like.
Woodworking Bookcase Ideas for Small Spaces
Not everyone has a big room right? I live in a small apartment myself and space is always a problem. So here are some woodworking bookcase ideas that work amazingly in tight spaces.
Corner Bookcase is one of my favorites. You take that useless corner of your room and turn it into a nice little reading spot. The design is basically two woodworking bookcase pieces joined at a 90 degree angle. Uses very little floor space but gives you plenty of shelf room.
Wall Mounted Floating Shelves are technically not a traditional woodworking bookcase but they work great for small rooms. You mount them directly on the wall so they take zero floor space. Perfect for a few favourite books and some small plants or decorations.
Narrow Tall Bookcase is another clever idea. Make your woodworking bookcase only about 12 inches wide but go tall, maybe 5 or 6 feet. It fits next to a door or in a hallway where you cant put anything wide.
Ladder Style Bookshelf is really trendy right now. Each shelf gets slightly smaller as you go up. It looks really cool and uses less material too. Great for a woodworking bookcase project when you are on a budget.
How to Make a Woodworking Bookcase for Under $50
This is the part everyone wants to know about. Can you really build a woodworking bookcase for less than fifty bucks? Yes absolutely. Here is how I did it.
Wood cost me about $25. I used standard 1×10 pine boards from Home Depot. Three 6 foot boards were enough for my entire woodworking bookcase. Some stores have discounted or slightly damaged boards that are perfectly fine for projects like this. Always check the discount rack first yaar.
Screws and wood glue cost about $8. A box of wood screws and a bottle of Gorilla wood glue. Thats all I needed for putting everything togather.
Stain and finish was around $12. One small can of stain and a small can of polyurethane. You can skip this completely if you want to save even more money. Just sand it smooth and leave it natural. Nothing wrong with that at all.
So total? About $45 for a nice looking woodworking bookcase that holds all my books and even some decorative items. Compare that to buying one from a store for $200 or more. The savings are real freinds.
And you know what, I checked Ana White’s bookcase plans page and she also shares tons of free plans for building affordable bookshelves. So many good ideas there if you want more inspiration for your own build.
Free Bookshelf Plans Woodworking Resources
Finding good woodworking bookcase plans doesnt have to cost money at all. There are tons of free resources available online for beginners.
Kreg Tool has some amazing free bookshelf plans woodworking people love. They share step by step project guides that are really beginer friendly and well explained. Worth checking out if you want something with pocket hole joinery.
Popular Woodworking also offers free bookcase plan collections that cover many different styles and skill levels. Great place to get woodworking bookcase plans pdf downloads for different designs.
For built in bookcase plans PDF just search around a bit and you will find plenty of options. Built in bookcases are a bit more advanced though. You have to figure out how to make your bookcase fit perfectly against the wall and look like its part of the room. I would say try a freestanding woodworking bookcase first, get comfertable with the basic skills, then move to built ins later.
Simple bookshelf plans are everywhere online. The trick is finding ones that match your skill level and budget. Dont try to build something too complex on your first attempt. Keep it simple, learn the basics, then level up with your next woodworking bookcase project.
Common Mistakes Beginners Make (I Made Them All)
Let me save you some pain and share the mistakes I made with my first woodworking bookcase. Because honestly I wish someone told me these things before I started.
Not checking if wood is straight. I grabbed boards from the rack without looking properly and two of them were warped. A warped board means a crooked woodworking bookcase. Always sight down the edge of the board before buying. If its bent even a little, put it back and grab another one.
Skipping the pilot holes. I mentioned this before but its so importent. When I screwed into pine without pilot holes on my first try, the wood cracked right at the edge. Had to go buy a new piece. That was frustrating and a waste of money. Always drill small pilot holes before driving your screws in.
Not using a square. My first woodworking bookcase was slightly crooked because I didnt check my angles while assembling. Everything looked fine until I put it against the wall and saw a gap on one side. Use a square tool at every step. Seriously, every single step.
Rushing the finish. I was so excited to see my completed woodworking bookcase that I put the books on it before the stain was fully dry. Big mistake. Got stain marks on some of my books. Let the finish cure properly, at least 24 hours, before loading your bookcase up.
Should You Build a Woodworking Bookcase or Buy One?
This is a question I get asked a lot. And my honest answer is it depends on what you value more. Time or money and satisfaction.
Building your own bookshelf is almost always cheaper than buying a ready made one from the store. Plus a homemade woodworking bookcase gives you full control over the size, the wood type, the color, everything. You cant get that level of customization from a store bought shelf no matter how much you pay.
Most cheap store bought bookshelves are made from thin particleboard that falls apart after a year or two. When you build your own woodworking bookcase with real pine or plywood, it lasts way longer. Its just better quality overall.
But if you have no interest in learning woodworking and just want a bookcase right now, then buying one is perfectly fine too. No judgement from my side at all. Everyone has different priorities.
For me personally, building my own woodworking bookcase was one of the most satisfying things I have ever done. When I see it in my room every day, full of books, I feel proud. Like yeah I made that with my own two hands. That feeling you cant buy from any store bro.
Tips to Make Your Woodworking Bookcase Last Longer
Nobody wants to build something that falls apart in a year right? Here are some tips I follw to make sure my woodworking bookcase stays strong for a long time.
Keep it away from direct sunlight if you can. Sun fades the stain color over time and can even dry out the wood making it crack. If your bookcase is near a window, maybe add some curtains or move it to a shaded spot.
Dont overload the shelves. Every woodworking bookcase has a weight limit depending on the wood and shelf width. For a standard pine bookcase with shelves around 24 inches wide, I would say dont put more than 30 to 35 pounds per shelf. Heavy books should go on the bottom shelfs always.
Wipe it with a damp cloth once a month. Dust can build up and make the wood look dull and old. A quick wipe keeps your woodworking bookcase looking fresh and clean like new.
If you used stain, reapply a coat of polyurethane every couple of years. This protects the wood from scratches and moisture damage. Its like sunscreen for your bookcase haha. Takes just 30 minutes but adds years to the life of your build.
Conclusion
So there you have it freinds. A complete guide on how to build your own woodworking bookcase without spending too much money or needing fancy tools. I hope this post helps you take that first step. Because honestly the hardest part is just starting. Once you make your first cut, everything flows from there naturally.
I have built three woodworking bookcase projects now since that first one. Each one got a little better, a little straighter, a little more polished. And thats the beauty of woodworking na. You improve with every project you do.
If you are a complete beginner and this is your first DIY project ever, a woodworking bookcase is seriously one of the best places to start. Its simple, its useful, its affordable, and the satisfaction you get from building something with your own hands is just unmatched.
Go grab some pine boards this weekend and start building your woodworking bookcase. You got this!
FAQs
What is the easiest bookcase to build for beginners?
A simple three shelf open bookcase using pine boards and basic screws is the easiest to build. No complex joints or expensive tools needed at all.
How much does it cost to build a woodworking bookcase yourself?
You can build a basic woodworking bookcase for around $30 to $50 using pine wood and simple hardware from any local store. Way cheaper than buying one.
Can I build a bookcase without power tools?
Yes you can! A hand saw, a screwdriver, and sandpaper are enough for a small woodworking bookcase. It takes more time but its totally doable.
What is the best wood for a budget bookshelf?
Pine and plywood are the best budget options for a woodworking bookcase. Pine costs around $2 to $3 per board foot and a sheet of plywood runs about $30 to $40.

Pingback: 7 Easy Apartment Woodworking Projects (No Garage Needed)