
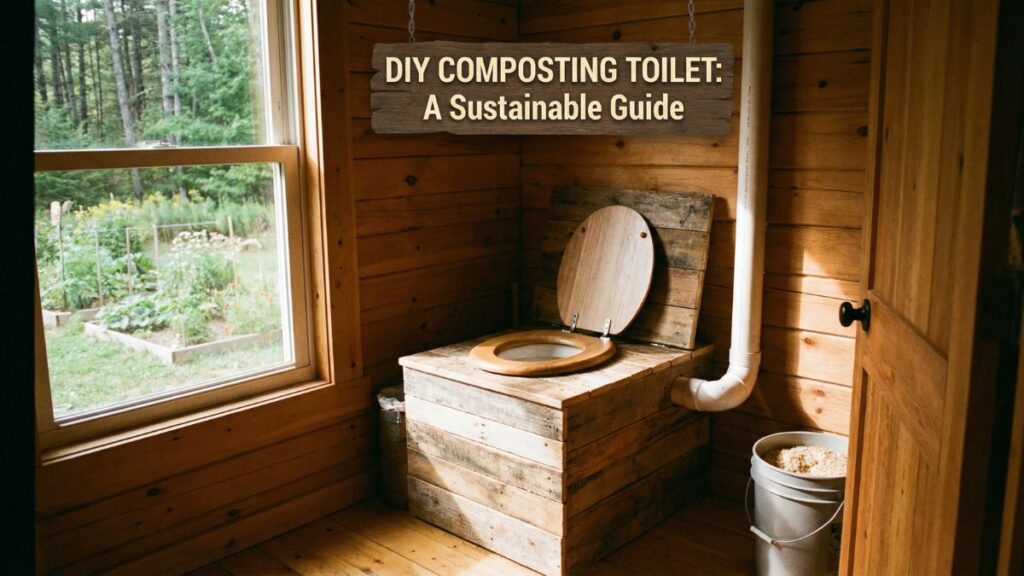
Hey guys! Welcome back to easydiywood.com. I’m Udit Das, and today we gonna talk about something super intresting – diy composting toilet. Hmm, I know what you thinking right now… toilet? On a wood blog? But trust me, this is one of the most usefull woodworking projects I ever made!
So basically, I started making this thing when I wanted to setup a small cabin in my backyard. And you know what, I didn’t want to spend thousands of dollars on fancy plumbing and all that stuff.
What Exactly is a Composting Toilet?
Okay so let me explain this in simple words. A composting toilet is basically a waterless toilet system that turns your waste into compost. Yeah, you heard it right – no water needed! The whole idea is that good bacteria breaks down the solid waste over time and and it becomes like soil.
The best part? You don’t need any complicated plumbing or septic tank connection. That’s why so many peoples use it for tiny homes, cabins, RVs, boats and off-grid living situations.
Why Should You Build a DIY Composting Toilet?
Lemme tell you why I decided to build my own diy composting toilet instead of buying expensive ready-made ones:
Saves Money Big Time Commercial composting toilets can cost anywhere from $500 to $2000 or even more. But my homemade version? I build it under $100. That’s a huge saving, right?
Eco-Friendly Option Traditional flush toilets use around 1.6 gallons per flush. Multiply that by how many times your family uses toilet daily… that’s lot of water going waste. With composting toilet, you using zero water.
Perfect for Off-Grid Living If you have cabin, tiny home, or campsite where there’s no water connection, a diy composting toilet is absolutly the best solution.
Simple to Build Even if you are beginner in woodworking like me, you can totally make this project in one weekend.
Materials Needed for Your DIY Composting Toilet Project
Before starting your diy composting toilet, gather these items from your local hardware store:
- Plywood boards (3/4 inch thick)
- One 5-gallon bucket with lid
- Toilet seat
- Wood screws
- Sandpaper
- Wood glue
- Hinges (2 pieces)
- Urine diverter (optional but helpfull)
For cover material, you’ll need sawdust or wood chips. Some peoples also use coconut coir which works really good for absorbing moisture and controlling smell.
Step-by-Step Building Process
Step 1: Cutting the Wood Pieces
First thing first, you need to cut your plywood. Here’s the measurements I used:
- Two side panels: 10 inches x 18 inches
- Front panel: 10 inches x 20 inches
- Back panel: 10 inches x 20 inches
- Top piece: 20 inches x 20 inches
You can use hand saw but electric jigsaw makes job much easier and faster. Safety goggles please don’t forget!
Step 2: Building the Box Frame
Now arrange all the cut pieces and start screwing them together. Apply some wood glue on edges before screwing – this makes the joint much stronger. Keep checking with square tool that everything is at 90 degree angle.
The box should be sturdy enough to hold person’s weight, so don’t be shy with the screws guys.
Step 3: Making the Hole for Bucket
This is important part. Place your 5-gallon bucket upside down on the top piece and trace around it. Then cut the circle slightly smaller than the traced line – maybe half inch smaller. Why? Because you want the bucket rim to sit on top, not fall through!
I made this mistake first time and had to cut another piece. Learn from my mistakes haha.
Step 4: Attaching the Toilet Seat
Once the hole is cut nice and smooth, attach your toilet seat on top. Most seats come with bolts and everything. Line it up properly with the hole and secure it tightly.
Sand the edges of hole so there’s no rough spots that could catch on bucket.
Step 5: Adding the Hinges
Attach the top piece to back panel using two hinges. This way you can lift the top easily when you need to remove the bucket. Make sure hinges are strong quality ones – cheap hinges will break after few months.
Step 6: Finishing Touches
Sand the entire unit smoothly and apply waterproof sealant or paint. This is very important step because moisture can damage the wood over time. I used marine varnish on mine and it’s working great even after one year.
How to Use Your DIY Composting Toilet Properly
Alright so your diy composting toilet is ready now. But how to use it correctly?
Start by putting 2-3 inches layer of sawdust or coconut coir at bottom of bucket. After each use, add another scoop of the cover material on top. This helps in:
- Controlling bad smells
- Absorbing moisture
- Starting the composting process
- Keeping flies away
The key secret here is keeping liquid and solid separate. When urine mixes with solid waste, that’s when the stinky smell happens. If you install urine diverter, it will direct liquid to a separate container.
Managing Smell – The Biggest Concern
I know this is the first question everyone asks – “But Udit, doesn’t your diy composting toilet smell terrible?”
Honestly, when done properly, there is almost no smell! The smell only comes when liquid and solid gets mixed together. Here’s what I do:
- Use plenty of cover material after each use
- Add small vent fan if using indoors
- Empty the bucket before it gets too full
- Keep area well ventilated
Some peoples add coffee grounds or dried leaves also which work really well for odor control.
Where Can You Use This Toilet?
The beautiful thing about homemade diy composting toilet is its versatility:
- Backyard workshop or shed
- Camping trips
- RV or camper van
- Tiny house
- Hunting cabin
- Emergency preparedness
- Garden outhouse
I have mine in my workshop and another one at my friend’s farmhouse. Both working perfectly fine.
Disposing the Waste Safely
Now comes the next question – what to do with full bucket?
The waste needs to compost for long time before using as fertilizer. According to EPA composting guidelines, composting is nature’s way of recycling organic material. Most expert say atleast 1-2 years of composting is needed for safety. Here’s what I do:
- Transfer contents to large compost bin
- Cover with more carbon material (leaves, straw)
- Let it sit for minimum one year
- Use only on non-food plants first
Always follow proper safety guidelines for composting human waste – never use on vegetable garden directly!
Common Mistakes to Avoid When Building DIY Composting Toilet
From my experiance building multiple units, here’s what NOT to do:
- Don’t use thin plywood – it will sag and break
- Don’t skip waterproofing step
- Don’t use bucket without proper cover material
- Don’t let bucket overfill
- Don’t forget ventilation holes
Cost Breakdown of My DIY Project
Let me share what I spent on my diy composting toilet:
| Item | Cost |
|---|---|
| Plywood | $35 |
| Bucket with lid | $8 |
| Toilet seat | $25 |
| Hardware (screws, hinges) | $12 |
| Sealant/Paint | $15 |
| Total | $95 |
Compare this to commercial units costing $800-1500, you saving big money!
Final Thoughts on Building Your DIY Composting Toilet
So there you have it guys – complete guide to build your own diy composting toilet from scratch. Is it challenging? Little bit, yes. But is it worth it? Absolutly!
If you want to go deep into this topic, I highly recomend reading the Humanure Handbook by Joseph Jenkins – its like the bible for composting toilet enthusiasts!
This project taught me so much about sustainable living and simple woodworking. The satisfaction of using something you built with your own hands… there’s nothing like it.
If you have any questions about this diy composting toilet project, drop them in comments below. I try to answer everyone personally. And if you make one yourself, send me pictures – I love seeing your builds!
You may read this also : 15 Easy DIY Wood Projects to Make Money From Home
Till next time, keep making and keep creating!


Pingback: Norwegian Woodworking: Stunning Guide That Changed My Life