
Okay so few weeks back my neighbour asked me, bhai how do you join two wood pieces without nails, and that time i showed him a woodworking lap joint I made for my old shelf. He was like whoa this looks strong but simple too. That moment I decided, let me write proper guide on woodworking lap joint for people like him, who are just starting out and don’t want to spend big money on tools.
If you are also new to wood work and searching something easy but strong joint, then woodworking lap joint is honestly one of best choice you can pick. It don’t need expensive machine, don’t need years of practice, just patience and little bit care.
In this post I am sharing what I learned, mistakes I made, and how you can make your own woodworking lap joint on tight budget. Not a perfect tutorial, just my real experience as a hobbyist, so read till end okay.
What Exactly Is A Woodworking Lap Joint
So basic definition first, a woodworking lap joint is when two pieces of wood overlap each other and some wood is removed from one or both pieces so they sit flat together.
Think of it like two hands doing high five but instead of slapping, they slide into each other and become flush. That is roughly how woodworking lap joint work.
There are two main kind, full lap and half lap. In full lap nothing removed, wood just gets double thick at joint. In half lap, which is more common, you remove half thickness from both piece so final joint stays same thickness as rest of board. If you want to read more about joinery basics, this guide on lap joints from Wikipedia explains the engineering side nicely.
For beginner like us, half lap version of woodworking lap joint is easiest one to start practicing.
Why I Recommend Woodworking Lap Joint For Beginners On Budget
Honestly, when I started wood work, I had literally no money for costly dado blade or router. My tool box had one hand saw, one old chisel and a hammer, that’s it.
Woodworking lap joint became my favourite because it don’t demand fancy tools. You can literally make it with saw and chisel, sitting in balcony or small room.
Also compare to butt joint, this joint is stronger because more wood surface touches for glue to hold. I actually wrote separate post comparing this, you can check my butt joint woodworking guide if you want to see difference side by side.
Budget wise, woodworking lap joint cost almost zero extra, you just need scrap wood, some glue and little bit of your time. Perfect for students, working people, or anyone who don’t want to burn money on joinery.
Types Of Woodworking Lap Joint You Should Know
Now this part confused me a lot when I started, because there are so many names. Let me simplify.
Half Lap Joint most common type, half thickness removed from both boards, they meet flush. Good for frames, shelf, small tables.
Cross Lap Joint used when two boards cross each other in middle, like a plus sign. You see this in garden trellis or lattice work often.
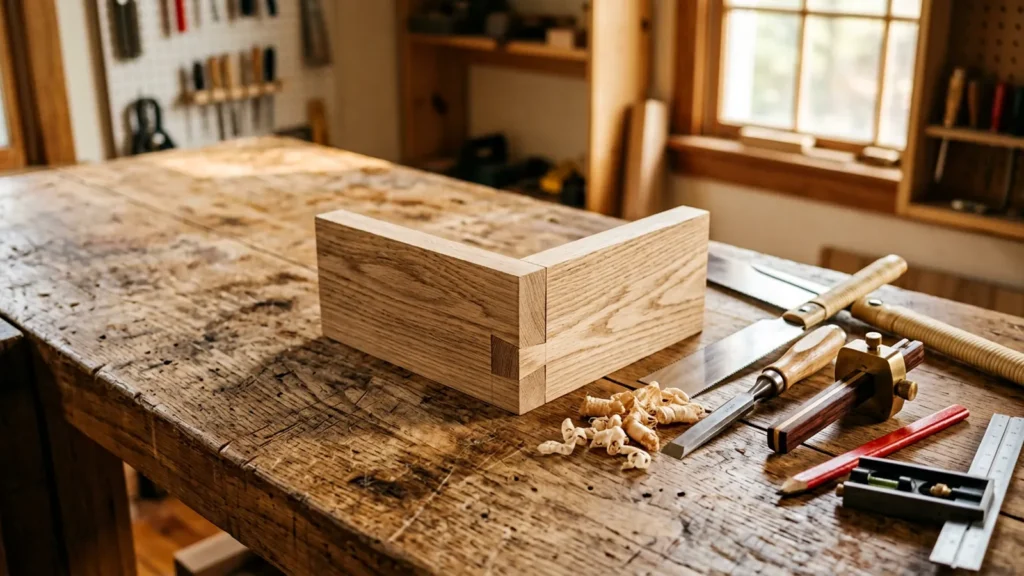
End Lap Joint both boards meet at their ends, mostly used to make corners like an L shape.
T Lap Joint one board ends in middle of other board, forming T shape.
Each of these woodworking lap joint variation is used based on what shape your project need. For beginner project, half lap and end lap are enough to practice first.
Tools Needed For Woodworking Lap Joint (Budget List)
You really don’t need workshop full of machine for this. Here what I personally used when starting my woodworking lap joint journey.
- A hand saw or basic tenon saw, nothing expensive
- A sharp chisel, half inch or one inch size works fine
- A small hammer or mallet
- Pencil and a square for marking straight line
- Wood glue, any basic carpenter glue will do
- Sandpaper for smoothing edges after
If you want more accurate marking, a proper marking gauge really helps a lot, I explained which one is good for beginners in my best marking gauge for woodworking beginners post, you can check that for cheap options.
Table saw with dado blade is faster yes, but for someone just starting woodworking lap joint practice, hand tools teach you more control honestly.
Step By Step, How I Cut My First Woodworking Lap Joint
Okay this is real talk part, not textbook style. Here how i actually did it first time, mistakes included.
Step 1: Mark the area. Take your two wood piece, decide where they will overlap. Use pencil and square to draw straight line where cut will happen.
Step 2: Mark the depth. For half lap woodworking lap joint, depth should be exactly half of wood thickness. If board is one inch thick, mark half inch depth line on side.
Step 3: Make the shoulder cut. Using hand saw, cut straight down on your marked line, only up to half depth, not all the way through. This becomes the shoulder of your woodworking lap joint.
Step 4: Remove waste with chisel. Place chisel flat and gently tap with hammer to remove wood between the cuts. Go slow here, don’t rush, i rushed first time and chipped extra wood, looked ugly.
Step 5: Test fit. Put both piece together and see if they sit flush. If too tight, shave little more with chisel. If loose, that’s okay too actually, glue will fill small gap.
Step 6: Glue and clamp. Apply wood glue on both mating surface, press together, clamp it tight for few hours minimum.
That’s basically whole process of making woodworking lap joint by hand. Not perfect science, just careful cutting and patience.
Mistakes I Made While Learning Woodworking Lap Joint
I am not going to pretend I got it right first try, so here few things went wrong for me.
First mistake, I cut on wrong side of line, removed material from wrong piece. Wasted good wood that day, felt so bad honestly.
Second, my depth was uneven, one side deeper than other, so joint looked slanted. Lesson learned, always mark depth on both edges not just one side.
Third mistake with woodworking lap joint, I didn’t clamp long enough, glue didn’t set properly and joint came loose after few days. Now I always leave clamp overnight minimum.
If you avoid these three things, your woodworking lap joint will come out way better than my first attempt did.
Budget Beginner Projects Using Woodworking Lap Joint
Once you get comfortable, try these small project to practice more.
A simple picture frame corner is good starting project for woodworking lap joint practice, low cost and quick to finish.
Small wall shelf bracket also works great, using T lap or cross lap style joint for support arms.
Garden trellis or plant stand is fun project too, since cross lap joint is naturally used where wood pieces cross each other.
Even a small step stool for kids can be made with woodworking lap joint at the corners for extra strength without buying metal brackets.
Woodworking Lap Joint Vs Butt Joint Vs Mortise And Tenon
People often ask me which joint is best, so quick honest comparison here.
Butt joint is fastest to make, just two flat ends glued together, but weakest of all three, mostly needs screws or nails as backup.
Woodworking lap joint sits in middle, stronger than butt joint because of bigger glue surface, but easier to make compare to mortise and tenon.
Mortise and tenon is strongest overall, but takes more skill and time, not ideal for absolute first timer.
So if you asking me, for beginner budget project, woodworking lap joint gives best balance of strength and simplicity, that is why I recommend it so much on this blog.
Tips To Make Your Woodworking Lap Joint Stronger
Always use good quality wood glue, cheap glue can fail over time, brands like Titebond wood glue are trusted by many woodworkers and not too costly either.
Clamp your woodworking lap joint tightly and leave it for full curing time, don’t touch it early even if it feels dry outside.
Sand both mating surface lightly before gluing, rough surface actually helps glue grip better, smooth is not always good here.
Test fit twice before final glue, once dry fit is done properly, actual gluing becomes stress free.
My Final Thoughts On Woodworking Lap Joint
So that’s my full experience with woodworking lap joint, from confused beginner to someone who now uses it in almost every small project.
It is not fanciest joint in woodworking world, no, but for someone starting out with low budget and basic tools, woodworking lap joint honestly teaches you real fundamentals, patience, measuring, and control with hand tools.
If you try this weekend, do let me know how your first woodworking lap joint turned out, and don’t worry if first one looks little rough, mine did too.
FAQs About Woodworking Lap Joint
Is a lap joint strong enough for furniture? Yes, when glued properly a half lap joint holds well for shelves, frames, and light furniture, though heavy load furniture may need extra support.
Can I cut a lap joint without a table saw? Yes, hand saw and chisel work perfectly fine for cutting a lap joint, it just takes more patience and careful marking.
What is the difference between a lap joint and a butt joint? A lap joint overlaps and removes material so pieces sit flush and glue surface is bigger, while a butt joint just joins flat ends with less strength.
Which wood is best for practicing lap joints? Soft wood like pine is best for beginners practicing lap joints since it cuts easily with hand tools and forgives small mistakes.