
Hello friend, myself Udit Das and honestly i am not some big carpenter or anything, just a normal guy from India who fell in love with wood work few years back. Today i want to talk about something small but very very useful, how to make a jig for cabinet knobs. First time i heard this word jig i was like, what even is this thing yaar. But dont worry, by end of this post you will know exactly how to make a jig for cabinet knobs, even if you never touched a drill in your whole life.
This is one of those project which look scary but actually take less time than making tea. So lets just start slow slow.
What Actually Is This Jig and Why You Need It
Ok so basic definition first. A jig is just a simple guide, mostly small piece of wood, that tell your drill exactly where to go. Thats it, nothing fancy.
When you learn how to make a jig for cabinet knobs, you basically save yourself from measuring every single door again and again with tape. Boring work, i know.
Also if you skip this and just eyeball it, chances are high your knobs will look crooked. I am saying this from personal shame, my very first kitchen project had one knob little higher and other little lower. My mother pointed it out for one full week, still she mention it sometimes lol.
Tools and Material You Will Need (Budget Friendly)
Good news for beginners, you dont need costly tools to figure out how to make a jig for cabinet knobs. Most of this stuff is probably already sitting in your house somewhere.
- Small scrap plywood or MDF piece, around 6 to 8 inch square
- Pencil and eraser
- Measuring tape or small ruler
- Combination square, not compulsory but nice to have
- Hand drill or cordless drill
- Drill bits, small size, matching your knob screw
- Sandpaper, optional
- One clamp, this help a lot trust me
Total cost, if buying fresh, stays under 400 rupees roughly. If you have scrap wood lying around like i did, its basically free. This is why i always tell beginners, this cabinet hardware jig project is one of cheapest DIY thing you can try this month.
Standard Cabinet Knob Placement Before You Begin
Before jumping into how to make a jig for cabinet knobs, its good to know roughly where knob should sit on door, because this confused me a lot when starting out.18 For framed cabinets, the usual practice is placing the knob around 2.5 to 3 inches from the bottom corner on an upper door, or the top corner on a lower door, keeping it about 1 to 1.5 inches in from the frame edge. For drawers, center is mostly fine, both side equal distance.
This is not some strict rule written in stone, just a comfortable starting point most people follow. Once you fix your measurement, thats when your jig become useful, because it repeat exact same spot every single time without new measuring.
How to Make a Jig for Cabinet Knobs (Step by Step)
Ok, finally the main part. Let me show you exactly how to make a jig for cabinet knobs, step by step, same way i do it in my small workshop corner at home.
Step 1, Cut Your Base Piece Take your scrap plywood and cut it square, around 6×6 inch is more than enough. This become the base of your jig.
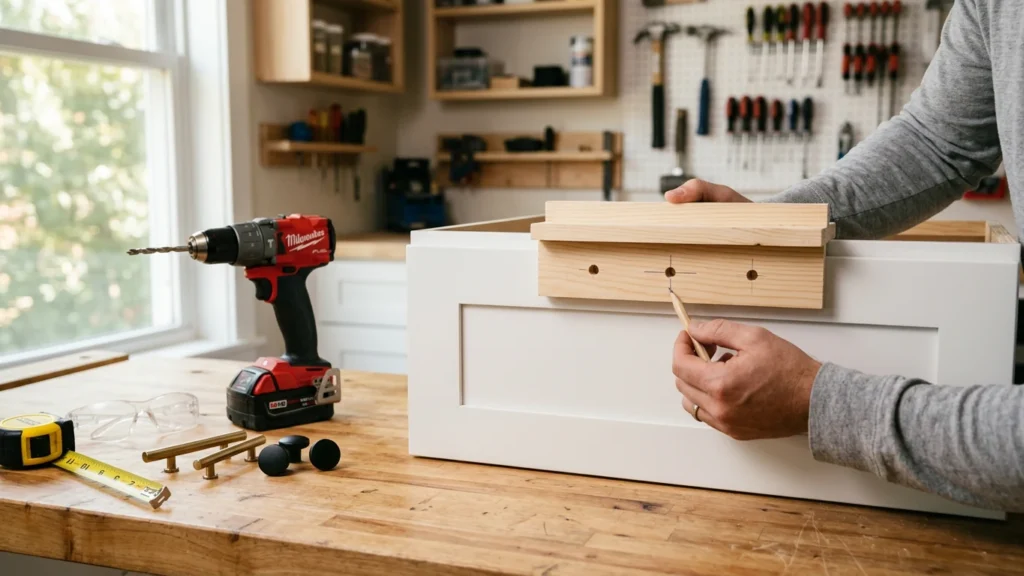
Step 2, Add Two Stop Cleats Glue or screw small strip of wood along two adjacent side of the square. These act as stopper, keeping jig aligned same spot every time it touch cabinet corner.
Step 3, Mark Your Measurement Using ruler, mark exact spot where knob hole should go, based on measurement discussed above, like 2.5 inch from corner. Small pencil mark is enough.
Step 4, Drill Pilot Hole in the Jig Itself Take your drill and drill straight through that marked point, but on the jig, not the cabinet yet. Match bit size to knob screw, usually 3/16 inch work for most standard knobs.
Step 5, Test It on Scrap Wood First Before touching real cabinet door, test this jig on scrap piece. I skipped this step once and regret it so much, my hole came bigger than screw and whole thing wobbled.
Step 6, Use It on Every Door Now place jig on corner of each door, cleats touching edges tight, drill through hole. Same exact spot, every single time, no tape measure needed anymore.
Honestly, this is the whole process of how to make a jig for cabinet knobs. Nothing complicated, just need patience for first attempt, rest become easy after that.
How I Actually Use This Jig on Real Doors
When drilling for real, hold jig firm against door, dont let it slip even little bit. I personally use a clamp because my hand shake little, specially after too much chai.
Also keep small wood block behind door while drilling, this stop back side from splitting or chipping, mostly with cheap plywood doors. If you want full detail on this splitting problem, i already wrote whole guide on how to screw into wood without splitting it, it help a lot with knob screws too, worth checking.
This whole approach of how to make a jig for cabinet knobs work well because it remove human error from equation. Our eyes can fool us easily but a jig simply cannot lie.
Common Mistakes Beginners Make (I Made Most of Them)
- Not testing jig on scrap wood first, big mistake
- Using wrong size drill bit for the screw
- Forgetting to clamp jig, it moves mid drilling
- Not checking if jig sit square against edge
- Mixing left and right doors, yes this really happen
When i first tried how to make a jig for cabinet knobs, i literally mixed up left and right door and knob ended on wrong side for two doors. Had to fill hole with wood filler and redrill, total waste of time.
Budget Tips for This DIY Cabinet Knob Project
You really dont need fancy metal jig kit for this, those thing cost anywhere from 800 to 2000 rupees online, sometimes more for the aluminium ones.
Making your own jig from scrap wood cost almost nothing, and honestly for a beginner it teach you more too. This is exactly why i keep saying, learning how to make a jig for cabinet knobs yourself is smarter than buying ready made template.
If you want accurate marking lines instead of just pencil guessing, check my post on wood marking gauge, it make the whole marking process way more precise.
For buying actual drill bits or knob hardware if your budget allow little extra, sites like Home Depot or Kreg Tool have decent affordable options for beginners.
Why Every Beginner Should Try This Project Once
I really beleive every beginner woodworker should try learning how to make a jig for cabinet knobs at least once, even if kitchen not needing it right now.
It teach basic jig thinking, which help in future project too, like drawer pulls or even shelf pin holes. Small skill but very transferable skill.
Plus theres something satisfying watching all knobs line up perfect after using your own homemade jig. First time i saw all six doors matching perfect, i literally called my friend to show him, he was not that impressed but i was very proud.
So yes, dont underestimate how to make a jig for cabinet knobs just because it sound like small beginner task.
Frequently Asked Questions
Is it hard to learn how to make a jig for cabinet knobs? No not really, its one of simplest jigs in woodworking, most beginner finish it under 30 minutes easily.
What wood works best for this cabinet knob jig? Plywood or MDF scrap piece work best, they stay flat and give clean drill holes without much effort.
Can same jig work for different size cabinets? Yes mostly, but if knob position change a lot between doors, better make separate jig for that size.
Do i need drill press to make this jig? No, normal hand drill or cordless drill work perfectly fine, drill press just make it slightly easier, not compulsory at all.
Final Thoughts
So friend, this was my honest take on how to make a jig for cabinet knobs, coming from a regular guy who learned mostly by making silly mistakes. If i managed this in my tiny home workshop, you can definately do it too.
Dont overthink this project too much, just grab scrap wood, follow the steps above, and you will master how to make a jig for cabinet knobs on your very first try itself, maybe with one small mistake like me, but thats perfectly fine, thats literally how we all learn na.
If this post helped you even little bit, go explore more simple budget friendly guides on my site, i keep sharing these type of beginner project almost every week.